My Stampin' Up! Classes

Monday, August 20, 2012

Warm Winter Memories ice skate card for Christmas


Snow and ice skating are a long ways off, but I love this stamp set called Winter Memories you can find in the Holiday Catalog on page 19. It's a 5-piece stamp set and I used two of the stamps - the ice skates and the sentiment - for this card.

My favorite part of this card is the label framelit diecut from Early Espresso Core'dinations card stock. After embossing it, I sanded it. I think it looks spectacular! This was one of four cards at my Express Christmas Workshop last week.

Stamps: Winter Memories;
Ink: Early Espresso;
Paper: Very Vanilla, Early Espresso, Candlelight Christmas Specialty Designer Paper, Early Espresso Core'dinations Card Stock;
Accessories: 1/8" Early Espresso taffeta, Neutral brads, dimensionals, sponge dauber, paper piercer and mat, labels framelits, Northern Flurry embossing folder.


Snow Festival paper and mitten bring Wacky Wishes to life


Snow Festival designer series paper ROCKS! I love all of the great patterns and colors. This was another of my cards for the Express Christmas Workshop last week. Stamp a couple things, punch them out and stick 'em on and you've got a cute Christmas card!

Stamps: Wacky Wishes (hostess), Make a Mitten;
Ink: Cherry Cobbler, Gumball Green;
Paper: Whisper White, Cherry Cobbler, Snow Festival dsp;
Accessories: 2-1/2" circle punch, Mitten Builder Punch, Gumball Green stitched ribbon, dimensionals.

This Christmas card uses all of the Merry Minis!


I love the simplicity of this card. It uses the Merry Minis stamp set, Merry Minis Punch Pack, and the 1" and Postage Stamp punches, along with the Extra Large Scallop edgelit.

To make the card a little bit special, the card body is Shimmery card stock, so it sparkles in real life. I also love the stitched Wild Wasabi ribbon. The colors came right from the Color Coach - Rose Red, Wild Wasabi and So Saffron.

If you'd like to order the items used to make this card, please visit my Stampin' Up! website at http://TheRubberRoom.stampinup.net and click SHOP NOW. There are still some great Clearance Rack products too.

Sunday, August 19, 2012

Wonderful Winterland penny spinner card


Bear with me as I write several posts today. I have been taking photos and getting things organized in my stamp area in preparation for another busy week. I have many more Christmas cards to post. I'm not all about Halloween, though I do enjoy it!

I love cards with movement! And this penny spinner Wonderful Winterland card is so fun and easy to make. This was one of my club projects this month.

I started with a Baja Breeze card, running the front through the Big Shot in the Perfect Polka Dots embossing folder. Using the Apothecary Accents Framelits, I diecut this oval-like shape from Snow Festival dsp, then used the Word Window punch to punch through both layers 2+ times, making a track on which the spinner will rest.

The spinner is a penny, two dimensionals on top of each other, and a second penny. Then I stuck two dimensionals side by side on the outside of one penny and stuck it to the back middle of my "medallion" - the kid innertubing. I used a combination of markers and ink pads with a blender pen to color the image, outlining the entire thing in Sahara Sand to make the other colors pop.


Order 24/7 from my Online Store: http://TheRubberRoom.stampinup.net;

Get a FREE Halloween Project Kit when you buy the Starter Kit for only $99 plus tax thru August 31, 2012. You can fully customize your kit thru my SU! website.

A So Sorry card for so many occasions


This brayered So Sorry card was a club project from last month. I love brayering as a technique. It covers the surface quickly and easily. I used glossy white card stock for the brayered layer, first brayering the entire piece with Daffodil Delight ink, then going back and adding Pumpkin Pie ink from the top and bottom to make a sunset of sorts. A punched circle from a sticky note makes a nice mask for the sun.

After that, I stamped the sentiment and image from Serene Silhouettes in Basic Black ink. I left the inside blank, so this could be So Sorry times are tough right now, or So Sorry for the loss of your beloved pet, So Sorry you've been ill, or even So Sorry this is late. There are many options available.

Heidi's card here inspired mine.

Stamps: So Sorry (Item 126525 wood, $21.95 or Item 126527 clear, $16.95), Serene Silhouettes;
Ink: Daffodil Delight, Pumpkin Pie, Basic Black;
Paper: Whisper White, Glossy White, Pumpkin Pie, Early Espresso;
Accessories: Scallop trim border punch, 1-1/4" circle punch, rubber brayer

This quilted Top Note card is For The Birds


I love the little birds in the For The Birds stamp set. I used markers to color this image before punching it out with the 1-3/4" circle punch.


My club members made this card last month. It uses a quilting technique. We punched squares from Birds of a Feather dsp, adhered them to a quarter sheet of bond paper and then ran it through the Top Note die and Big Shot. It looks like a pretty, quilted blanket! And the stitched Raspberry Ripple ribbon is so soft.

Tuesday, August 14, 2012

Frightening Feline frame is Wicked Cool and lots of fun!


I'm so happy you're here for Week 3 of my 13 weeks of Halloween fun with The Great Pumpkin Blog Hop. I've got a fun home decor project this time around.


Each week, add your Halloween creation to my blog hop, along with the code near the bottom of each post. When you add the code to your blog while you are in the edit HTML mode, your readers can play along, leave comments, and view the samples right from YOUR blog!

At the end of 13 weeks, I'll be giving one person a $50 Stampin' Up! gift certificate! The more times you enter the blog hop, the better your chances of taking home the Grand Prize. You also get a ticket just for displaying The Great Pumpkin Blog Hop badge on your blog. Whoo hoo!


I wanted to create a Halloween decoration for my studio that is uniquely Stampin' Up!. I bought a wood frame for a buck at a craft store, traced it onto Howlstooth and Scaringbone dsp and cut it out. I used Mod Podge to adhere the dsp to the frame.


I stamped a couple of cobwebs on the frame from the Wicked Cool stamp set, then sponged around the frame with Basic Black ink. I traced the inside of the frame onto First Edition dsp, cut it out and heat embossed the Frightening Feline stamp in Basic Black ink (the new foam pads are juicy enough to do this!). To finish, I made a Spooky banner with a fun, twisted Crumb Cake tulle flower as decoration with a Neutral button and linen thread.

I've shown you my Halloween project - now show me yours! You've got until next Tuesday at 1 p.m. (PST). I can't wait to see what you come up with.


Sharing cards from a couple of new friends


I want to share a couple of cards with you today from new friends. The top one is from a 14-year-old girl named Sahara. I met her at the Kitsap Arts & Crafts Festival a few weekends ago, and then she came to visit me at my studio. I gifted her with some stamps, inks and paper. She loves crafting! There's no minimum age! Sahara sent me this adorable thank-you card.


Kathleen is a new friend of mine from Silverdale. I love how elegant this card looks with the black and white palette and the embossing on the butterflies and card front. Lovely!

Having friends like these reminds me how crafting has brought some wonderful people into my life. I'm extremely grateful!

Monday, August 13, 2012

Visiting the parts bin to make this pretty jewelry


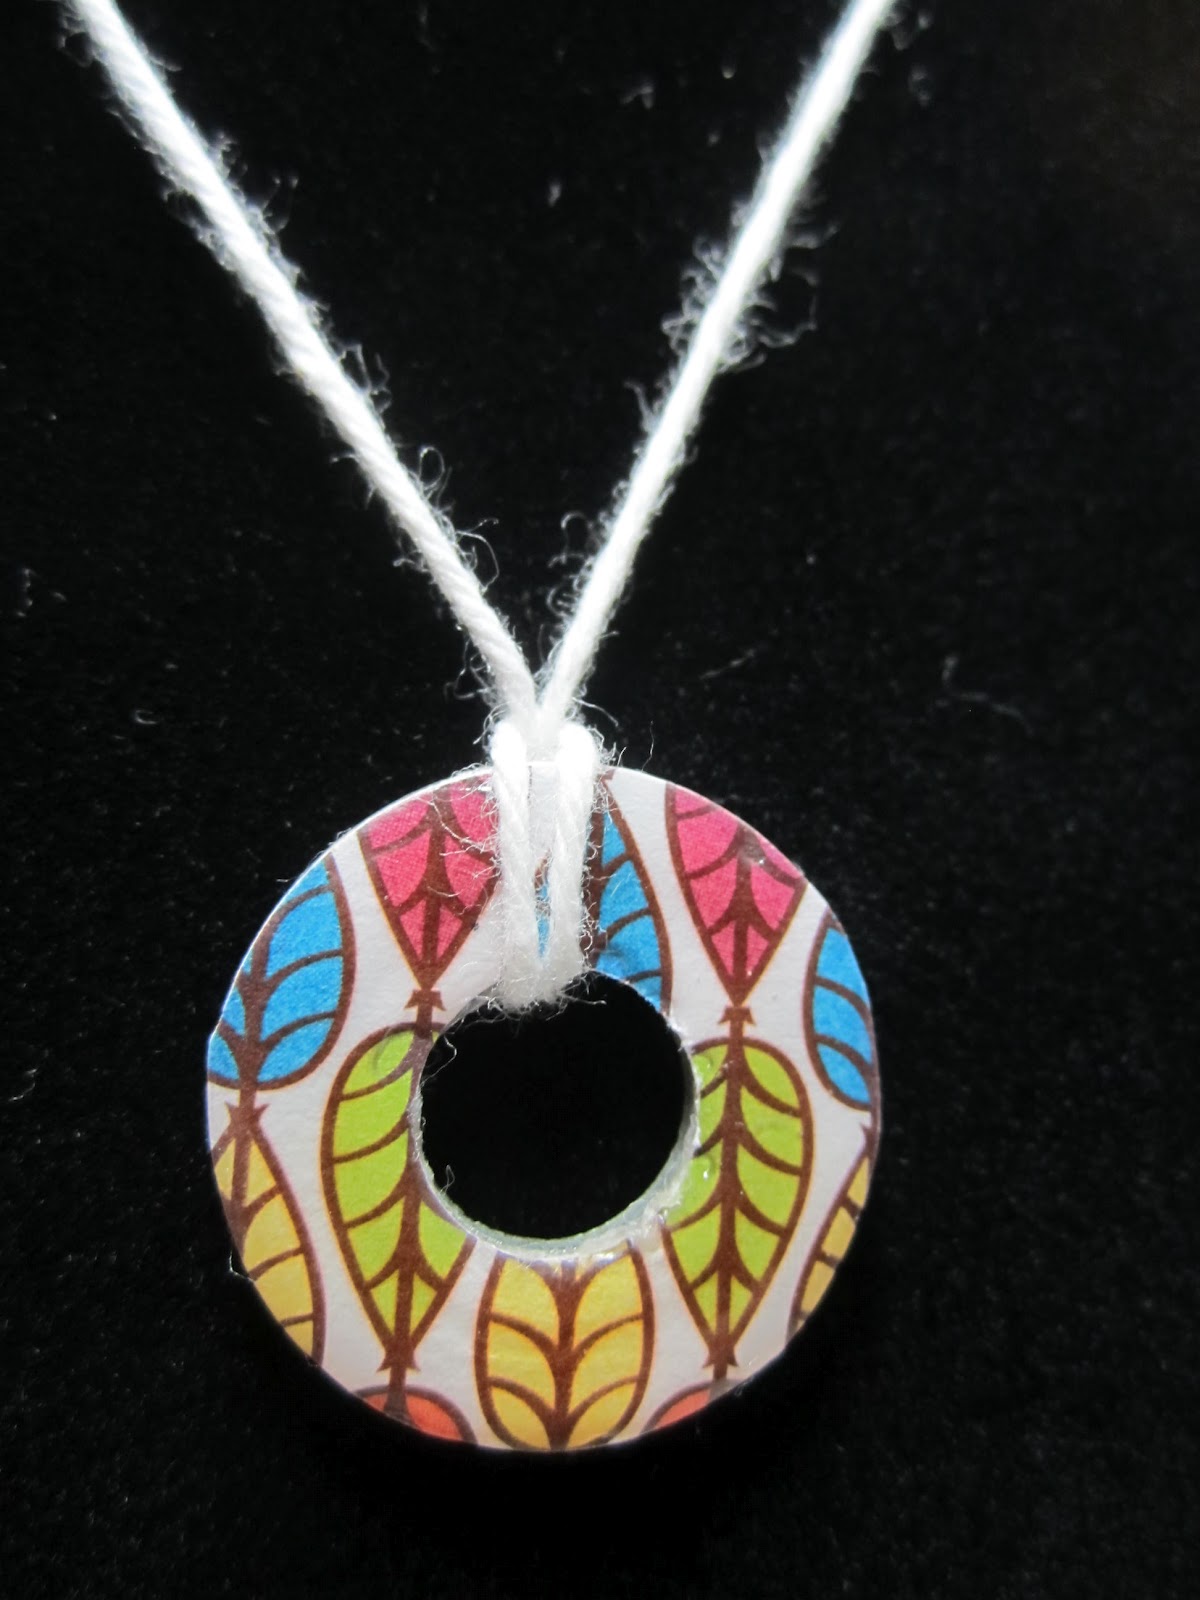
After seeing this idea on Pinterest, then in the latest issue of Stampin' Success, our demonstrator magazine, I felt the universe was telling me to make washer jewelry. So I raided my hubby's parts bin last night, selected a pack of my favorite designer paper - International Bazaar - and went to work.

I think they look like jewels here! Two of these have Howlstooth & Scaringbone dsp.

First, there were several different sizes of washers, and a nut (there's one in every bunch!). I figured most of the middles were about the size of the circle in the Itty Bitty Punch Pack. The middle circle was punched first, then I used either a 3/4" or 1" circle to punch out the ring that would cover the washer.

I used Tombow Liquid Adhesive to adhere the designer paper to the washer. Once it dried, if the paper was too large, I simply turned over the washer and used scissors to trim off the excess. It's easy because the scissors runs smoothly along the metal edge.

After the paper was adhered, I used Crystal Effects over the entire surface. That's it! I let them all sit overnight, and then added white baker's twine to several today.

I love this color of blue.

Hexagon nut

For the hexagon shape, I used the 1" square punch, glued it down and then once it dried, turned it over and trimmed off the excess. It was very easy to follow the straight lines!


So I'd like your input. I'm thinking about making more of these for a holiday gift festival in October. How much do you think I should sell one for?

Sunday, August 12, 2012

Fabulous Comfort Cafe fabric holders for your scissors


Everyone should have one of these terrific holders for their scissors! This fabric paper snips holder is the fourth project made by my American Ink achievers at their Rewards event. I die-cut Comfort Cafe fabric using the Petal Cone die, cut off the tabs, and used Stampin' Up!'s fabric adhesive to hold the batting (also run through the same die and the tab cut off) to the fabric. The most time-consuming part of this entire project was searching for my iron! I don't iron anything - but needed it here so the fabric adhesive stuck to the batting and the fabric.

This one was my prototype. I used extra batting leftover from my rag quilt project to strengthen this little holder. I used two layers of batting (one for each petal cone piece of fabric), and it was too thick. You can see part of the batting on the lower right side in this photo. One thickness proved just right. And my achievers used a blanket stitch to hand sew their holders. It was a quick project!

I used my sewing machine to stitch the two pieces of fabric together on the curved tops first, then folded it and sewed down the right side. I used the Fun Flowers die to cut Comfort Cafe fabric flowers, which I have attached with an antique brad using the Crop-a-dile so it holds the flap down too.

Friday, August 10, 2012

No danger here! Explosion Purse for AI Rewards event


This Marina Mist explosion purse was one of four projects my American Ink achievers made at my Rewards event last weekend. It uses a 12" x 12" piece of Marina Mist, the labels framelits for the flap, some crochet trim for the handle, and some of that 99-cent Sweet Stitches fabric cut by the Fun Flowers die with a Brushed Bronze button (Holiday Catalog) on top. It's just the right size to hold something fun like the Flameless Tea Light Birthday Cake I posted a few days ago!


I added 3-7/8" square pieces of First Edition Limited dsp down the middle. To get to this point: Score the 12" x 12" cardstock at 4" and 8" both ways (so you get a grid pattern of 4" squares.

Then score from each corner OUT on the diagonal. Cut off the corners (it'll make it easier to fold).

I scored a 1/4" mark on the left and right side of the 12" x 12" card stock at 6" then scored from that mark to the middle square corners to get those middle triangles you see in the photo.

Make sure you fold your card stock back and forth because it'll make it easier to fold into the purse shape.


Here's a side view. Yours will probably be prettier because mine got smooshed a bit on the side in my tote! I punched 1/8" holes through both framelits to add the crochet trim. The flap is only attached to the purse with Sticky Strip on the back half. A Velcro button holds the flap closed to the front.

Notice the Vintage Wallpaper embossing on the flap? I sanded it on the crazy cool Early Espresso Core'dinations card stock available now in the Holiday Catalog (item 127848 for $6.95).

One other note - at Convention 2012 in the "I am Savvy" class, SU! demo Laura Milligan showed all kinds of fabric flowers. She said if you add card stock or dsp to your flower, it'll hold the shape better. That's what I did here - I added a couple of layers of card stock. Hope you like it!

Thursday, August 9, 2012

99 Cent Fabric and Button Buddies congratulations cards


These notecards are for my American Ink achievers who couldn't make my event. They were sent one of these along with their gifts. I used scraps to  make these - except for the vintage buttons. I love those! They add bling!!!

Now for a fabulous deal - 

There are four different packages of Stampin' Up! fabric that are only 99 cents (regularly $9.95) right now on the Clearance Rack. Please visit my Online Store at http://TheRubberRoom.stampinup.net and click on SHOP NOW and then Clearance Rack.

Springtime Vintage and Sweet Stitches also has coordinating buttons on the Clearance Rack so you can make your Christmas gifts early and inexpensively!
Candy Cane Christmas Designer Fabric121715
 $0.99
Candy Cane Christmas Designer FabricCatalog Price: $9.95

Expand your crafting options with our new Designer Series fabric for a whole new look and range of project possibilities! Coordinating patterns in our playfully striped and polka-dotted Candy Cane Christmas bundle make it easy to create colorful, eye-pleasing projects. Combine with our Candy Cane Big Designer buttons for even more easy coordination. And of course, this fabric is a perfect medium for creating all kinds of beautiful Christmas projects using the Big Shot machine and our large collection of dies.

■ Combines exclusive designs and colors with high quality fabric
■ Coordinates with other Stampin' Up! products
■ Extra wide fat quarters
■ 100% cotton
■ Includes instruction booklet highlighting five projects you can create using fabric
■ Coordinates with Garden Green, Baja Breeze, Blushing Bride, Real Red
■ Coordinates with Candy Cane Christmas Suite
■ 28" x 18"
■ 3 coordinated designs

Deck The Halls Designer Fabric121716
$0.99
Deck the Halls Designer FabricCatalog Price: $9.95

Expand your crafting options with our new Designer Series fabric for a whole new look and range of project possibilities! Coordinating patterns in our vintage-looking Deck the Halls bundle make it easy to create colorful, eye-pleasing projects. Combine with our Deck the Halls Big Designer buttons for even more easy coordination. And of course, this fabric is a perfect medium for creating all kinds of beautiful Christmas projects using the Big Shot machine and our large collection of dies.

■ Combines exclusive designs and colors with high quality fabric
■ Coordinates with other Stampin’ Up! products
■ Extra wide fat quarters
■ 100% cotton
■ Includes instruction booklet highlighting five projects you can create using fabric
■ Coordinates with Cherry Cobbler, Soft Suede, Very Vanilla, Always Artichoke, Crumb Cake
■ Coordinates with Vintage Christmas suite
■ 28" x 18"
■ 3 coordinated designs

Springtime Vintage Designer Fabric121817
$0.99
Springtime Vintage Designer FabricCatalog Price: $9.95

Tender blooms, buds, and vines in unmistakable vintage style make the prints on our Springtime Vintage Designer Fabric downright pretty. Your fabric crafts and projects will bring to mind cherished memories or yesteryear and keepsakes passed down from beloved ancestors. They’re the perfect sweet patterns for making all kinds of gifts packed with love for family and friends.

■ Includes 1 each of 3 coordinating designs
■ Extra-wide fat quarter size; each piece approximately 28" x 18"
■ 100% cotton
■ Coordinates with Not Quite Navy, Baja Breeze, Rose Red, Pear Pizzazz, Crumb Cake, River Rock, Very Vanilla, and Always Artichoke
■ Coordinates with Springtime Vintage Designer Series Paper and Springtime Vintage Big Designer Buttons
■ Use with 1/2" Seam Binding Ribbon in coordinating colors for perfect finished look

Sweet Stitches Designer Fabric121818
$0.99
Sweet Stitches Designer FabricCatalog Price: $9.95

Here’s an assortment of Designer Series Fabric for the true-blue seamstress. With patterns that include darling decorative stitch designs, bunches of bewitching buttons, and vintage-style children posing in carefully sewn clothing, this brightly-colored, exuberant fabric will definitely appeal to crafters who love to sew. Just imagine all the sweet and functional projects you could make from it to decorate a loved one’s sewing room.

■ Includes 3 coordinating extra-wide fat quarters: 1 each of 3 designs
■ Each piece measures approximately 28" x 18"
■ 100% cotton
■ Coordinates with Tempting Turquoise, Tangerine Tango, Chocolate Chip, Melon Mambo, Regal Rose, Wild Wasabi, and Daffodil Delight
■ Coordinates with our Button, Button Set and In Stitches Stampin’ Around Jumbo Wheel
■Coordinates with products in our Oh Sew Suite

Wednesday, August 8, 2012

Are you ready for Week 2 of The Great Pumpkin Blog Hop?


Welcome back for Week 2 of my 13 weeks of Halloween fun with The Great Pumpkin Blog Hop.


Each week, add your Halloween creation to my blog hop, along with the code near the bottom of each post. When you add the code to your blog while you are in the edit HTML mode, your readers can play along, leave comments, and view the samples right from YOUR blog!

At the end of 13 weeks, I'll be giving one person a $50 Stampin' Up! gift certificate! The more times you enter the blog hop, the better your chances of taking home the Grand Prize. You also get a ticket just for displaying The Great Pumpkin Blog Hop badge on your blog. Whoo hoo!


For my card this week, I used Tricky Treats, cutting out the little ghost's mask and the entire curly label shape from a Jet Black StazOn-stamped image. I'd noticed when punching out the Tangerine Tango-stamped image that the punch cut off a bit all the way around. I also cut out the trick-or-treat bag from the black image, popped it up with a tiny dimensional, and added Dazzling Diamonds for the handle of the bag and the bottom of the ghost. The patterned paper is from the Howlstooth and Scaringbone dsp.

Now add your Halloween project! You've got until Tuesday at 1 p.m. (PST).


Tuesday, August 7, 2012

31% Off Digital for 31 Days

If you're looking for a bargain on some digital downloads, here's your chance! You have this month to purchase these through my Online Store at http://TheRubberRoom.stampinup.net (click on SHOP NOW).


Just about every Tuesday (that's today!), you can view the latest downloads here, as well as other My Digital Studio items.

What's on sale?
ALL cards, photobooks, individual pages, and tags. That's right: print any photobook, board book, swatchbook, individual pages, greeting card, postcard, trifold card, or tag-all for 31% off.
Some of our best digital content. 30 downloads and 1 content disc. Yup, that equals 31.

ItemDigital Content Retail Price31% Off Price
127217
Floral District Collection Disc $ 23.95 $ 16.53
118115
Night and Day Designer Series Paper $ 4.95 $ 3.42
129929
Candid Frames $ 2.95 $ 2.04
129921
Check This Out Page Templates $ 4.95 $ 3.42
129609
Blossom Builders Embellishments $ 5.95 $ 4.11
128999
It's All Me Kit $ 9.95 $ 6.87
127441
Whimsical Note Journal Template $ 1.95 $ 1.35
128342
Pinwheel Daily Calendar Template $ 9.95 $ 6.87
127599
Party Animal Kit $ 9.95 $ 6.87
127600
Autumn Traditions Kit $ 9.95 $ 6.87
127620
Grateful Heart Thanksgiving Ensemble $ 14.95 $ 10.32
126027
Playful Polka Dots Kit $ 9.95 $ 6.87
130066
World Traveler Photobook Template $ 17.95 $ 12.39
131221
Storybook Specialty Designer Series Paper $ 4.95 $ 3.42
130850
Joyful Times Kit $ 9.95 $ 6.87
124463
One Great Year Digital Kit $ 9.95 $ 6.87
127175
Limited Edition Embellishments $ 2.95 $ 2.04
129607
Walk in the Park II Kit $ 9.95 $ 6.87
129934
#HASHTHIS Stamp Brush Set $ 7.95 $ 5.49
129923
Book of Birthdays Swatchbook Template $ 12.95 $ 8.94
121071
Travel Journal Kit $ 9.95 $ 6.87
129924
Get it Done Kit $ 5.95 $ 4.11
129005
Sweetly Nested Framable $ 4.95 $ 3.42
127758
Delight in the Day Photobook Template $ 19.95 $ 13.77
130862
Blast Off Ensemble $ 19.95 $ 13.77
129890
Little Milestone Birthdays Greeting Card $ 7.95 $ 5.49
128892
Designer Gift Cards $ 4.95 $ 3.42
127580
And a Happy New Year Photocard Template $ 1.95 $ 1.35
127435
Thanks Tons Greeting Card Template Set $ 2.95 $ 2.04
127587
Sending Glad Tidings Designer Tags Kit $ 7.95 $ 5.49
127762
Gratitude Framable Designer Template $ 1.95 $ 1.35


The Floral District Collection Disc can go on a workshop order (as well as an online order.
There's no limit to how many sale items you can order. Go crazy!
Get your orders in by Friday, August 31. Submit OEX and online orders by 11:50 PM (MT).

Monday, August 6, 2012

Fabric goody bag for my American Ink team achievers


I love running Stampin' Up! fat squares through the Big Shot in the Fun Flowers die. It makes it quick and easy to cut out a bunch of flowers at one time (I did 8). I used all three patterns of fat squares in the box to make the fabric flower shown here, adding a couple of punched flowers so it would hold this shape, then used white baker's twine and a Cajun Craze button to hold it together.


Here's the goody bag each woman found at her place at lunch Saturday. All of the bags were made with the Comfort Cafe fabric. The largest flower is adhered to the front of the goody bag with a Jumbo Sticky Round (item 127852, 12 per package for $4.95). Each bag measured approximately 6" x 9" before being sewn. I used either the ruffled Pool Party ribbon or the Midnight Muse stitched ribbon, depending on the goody bag fabric.

I want to thank SU! demo Laura Milligan for this great idea. I saw her goody bag and fabric flowers at Convention 2012 during the "I am Savvy" class. I love it!

There's a great Starter Kit special during the month of August, and I'd love to have you join my team! For $99 plus tax, you get to fully customize your kit with up to $125 of high-quality SU! product AND you'll receive the Howl-o-ween Project Kit that is oh-so-spooktacular. You may sign up on my website at http://therubberroom.stampinup.net. Please contact me if you have any questions or need more information!

A little housekeeping: My 50-50-50 Chart winner


I've been so busy with convention, my booth at a three-day festival, and planning for my American Ink Rewards event that I almost overlooked my 50-50-50 Chart! As you can see in the above photo, it's full! Everytime someone ordered $50+, they got their name and date on the chart. There are a total of 50 spaces on the chart. It is almost a year to the date that I started the chart because the 50-50-50 Chart was suspended during Sale-a-Bration and when I had my own specials where EVERYBODY received something for a $50+ order.

So all of the squares were cut out and placed in a jar for one to be drawn the winner of a $50 SU! gift certificate from me.


That Ball jar has 50 squares in it, though it doesn't look like much! Congratulations to Beth!!! Her name was the lucky one drawn. It's not a huge surprise since I noticed while cutting them that she had the most squares. And right after I'd taken the photo, Beth called me to place an order. lol

Thank you everybody for your orders throughout the year!

Beautiful Wings embosslits thank-you card


My friend, Kathleen, made this card for me. I love how elegant the black and white looks with the embossed butterflies and white layer. She used the Postage Stamp Punch for the sentiment. Thanks Kathleen!

Flameless tea light birthday cake


This is a cute and easy project, and one my American Ink achievers made Saturday. Above, the flameless tea light is "on."


Make sure to punch a hole in the bottom of the scallop from the Perfect Pennants die so you can turn the flameless candle on and off!


This photo shows just about everything you need to make the project.

Use a 5-1/4" x 3/4" (or a tiny bit thinner) piece of designer paper for the side of the tea light. I used Sticky Strip on one, and Tombow Liquid Adhesive on a second. Both adhesives work well.

The scallop circle punched out of copy paper has been folded in half and then quarters, with the point snipped off. It's a template you set over the other scallop circle so you can make the hole for the flame part of the flameless tea light.

Embellish the top of the scallop with little flowers and rhinestones!

Then attach the tea light to the diecut scallop circle with dimensionals. That's it.

Week 1 of The Great Pumpkin Blog Hop ends tonight. Only 12 weeks left till Halloween! I hope you'll make time to create a Halloween project for this week's blog hop. Until then, take care!


Saturday, August 4, 2012

A fun day of rewards for my team achievers

I enjoyed a wonderful day with members of my American Ink team who are achievers. They earned a day of being spoiled by me for 1) earning a title of senior supervisor and above; 2) recruiting; 3) promoting to the next title; or 4) their sales. Though 11 in my group qualified for my rewards event, only five were physically able to show up today. I'll be mailing the others' gifts on Monday.

Today, I made these ladies a salad bar and baked potato with all the fixin's for lunch at my studio. And since temperatures were expected to reach 90 degrees, we had sherbet for dessert!

Each woman received a goody bag I'd sewn with Stampin' Up! product inside, and a gift for each of the four items above they qualified for. Then they sat down to make special projects - an explosion purse, a designer paper-covered frame, a flameless tea light birthday cake, and a fabric holder for their paper snips. I want to share how cute the frames turned out - and the photos of each person with their frame!

Kim with International Bazaar dsp
Olivia with Interational Bazaar dsp
Barb with Candlelight Christmas Specialty dsp
Teresa with Candlelight Christmas Specialty dsp

Kathy with Spice Cake dsp (retired -but it coordinates better in her home!)

It was so nice to be able to sit and chat while crafting. I always feel like I learn just a little bit more about everyone. Hopefully I'll see all of these ladies and more for my next American Ink Rewards event in October.

As for the goody bag and other projects, I'll take photos later to share. Thanks for looking! I hope you're enjoying your weekend and staying cool.

Wednesday, August 1, 2012

The Great Pumpkin Blog Hop starts today with Toxic Treats


I'm so excited to kick off 13 fabulously freaky weeks of Halloween fun with The Great Pumpkin Blog Hop today.


My kids actually came up with the name. They love this Snoopy cartoon!

Each week, add your Halloween creation to my blog hop, along with the code near the bottom of each post. When you add the code to your blog while you are in the edit HTML mode, your readers can play along, leave comments, and view the samples right from YOUR blog!

At the end of 13 weeks, I'll be giving one person a $50 Stampin' Up! gift certificate! The more times you enter the blog hop, the better your chances of taking home the Grand Prize. You also get a ticket just for displaying The Great Pumpkin Blog Hop badge on your blog. Whoo hoo!


I used the Petite Purse die for the Big Shot to make this party favor out of Howlstooth and Scaringbone dsp. I cut off the top flap, and the rounded sides at the top. Then I added a Trick or Treat banner from Toxic Treats, a stamp set I earned for FREE as an award for my sales this past year. I stamped the main image in Jet Black StazOn and die-cut it using the Labels Framelits, cutting a layer out of Basic Black card stock. There are a couple of Basic Glimmer Brads on the box too. You've got to have a little bling!


I'm submitting my party favor to Hand Stamped Sentiments for their Anything BUT a Card Challenge #129. You have until noon (CST) Monday to add your project.
Now it's your turn! Each week's blog hop will end on Tuesday at 1 p.m. (PST).