My Stampin' Up! Classes

Friday, July 29, 2011

It's time to celebrate with Monkey Challenge 67


I admit it... I love paper! And I especially love this Beau Chateau dsp. Did you know there's a special on designer paper starting August 1? Buy 3 packs and get 1 free!!! Wow! I love it.


My card this week is based on the A La Card Monkey Challenge 67: Celebration + A Sketch. I started with a Crumb Cake base and added a couple layers of Beau Chateau paper on top, using the Cutter Kit to distress the edges before sponging them with Crumb Cake. The "Congrats" is from the Tagtastic hostess set. After stamping the word in Soft Suede ink, I ran it through the Big Shot in the oval designer frame. There's a bit of Marina Mist dotted scallop ribbon on there, along with a couple pearls and a few pennants over some natural hemp.


Here's the sketch:

My booth at the Kitsap Arts & Crafts Festival


My friends and my kids helped me set up my booth at the 52nd Annual Kitsap Arts and Crafts Festival in Kingston yesterday. It was the first day of the festival. It was fun! I met loads of people, enjoyed a great sandwich, and some live music. The vendors around us are great people too.


This is just another view of the booth. I've got Star Albums, Flip-Flops Albums, Top Note Brag Books, purse giftcard holders, nugget treats, and two-pocket purses with four notecards each, in addition to retired stamps, punches and ribbons. Swing by if you're in the area! It's supposed to be a nice low-70-degree kind of day tomorrow. I'll be there from 10 a.m. to 6 p.m. (Sunday from 10 a.m. to 5 p.m.).

Wednesday, July 27, 2011

Baby pennant with rosettes


Here's one more thing to add to the list of stuff I'll have for sale at the Kitsap Arts & Crafts Festival this Friday thru Sunday. Kim came over this morning and we made five baby pennants using the Perfect Pennants die for the Big shot, 1-1/4" strips of retired designer paper for the rosettes, and some solid color card stock (Real Red, Pacific Point and Old Olive). The letters are from the Alphabet Simple Letters die.

We made an all pink banner, an all blue banner, then a few of these mixed colors. I also made a Welcome pennant banner for my booth!

New In Color Array of Sunshine card


You can see Pool Party, Lucky Limeade and Calypso Coral (all new In Colors for 2011-2013) on this Array of Sunshine card. And I love the dotted brad, also in the new In Colors. I CASE'd this card, though I don't remember from who. I'm sure I'll come across it and be able to add a name or link to her blog. See the ruffled ribbon? Love it! And the sentiment is from a new stamp set called Petite Pairs. What's great about this set is you get a phrase for the front of the card, as well as one for the inside. Hope you have a great day!

Monday, July 25, 2011

Two-pocket pouch tutorial

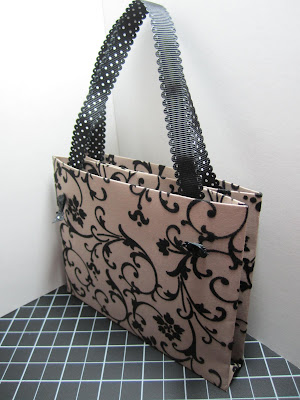
I promised a tutorial, so here it is! I learned how to make this 2-pocket pouch at a Stampin' Up! regional about four years ago. It uses one piece of 12" x 12" designer paper and a couple 15-inch lengths of ribbon for the handles, then you embellish it however you wish!


1. Score 1" on the left and right sides of a 12" x 12" piece of designer paper. I used Mocha Morning Specialty paper because I love the flocking!


2. Flip over paper and fold on the 1" lines you just scored. Adhere them down.


3. Add adhesive to one of the edges that doesn't have the folded back paper and roll the paper into a tube like this.


4. Keeping the seam in the middle, squish the tube flat then fold in half (seams together).


5. Open and lay flat the paper. Score at 4-1/2" and 5-1/2", then fold so the middle fold becomes a "mountain" and the other two are "valleys."


6. The bottom should look like a "W." Now adhere the top middle of each pouch to each other. It'll look like this from the side.


7. Cut 2 equal pieces of ribbon for the handles. I used 15" lengths of Basic Black dotted scallop ribbon for this pouch.


8. I used a Crop-a-dile to make 3/16" holes on the outside of each of the two pouches. I knotted one ribbon and fed it through a hole, then inserted it on the same side of the same pouch and knotted it again. Trim ends if necessary. Tie the other ribbon the same way, taking care to place the knots so the ribbon handles are equal.

Embellish your pouch as you like! And you can put anything from jewelry and candy to notecards inside the pouches.

Easy Events thank-you card


I made up a bunch of these for my latest batch of customer orders. I used the thank-you stamp from Easy Events, and used a blender pen and Cherry Cobbler pad to color the flowers. I love the Cherry Cobbler scallop dots ribbon - it's luscious!

Notecard Pouch and 4 notecards with mini envelopes


I've got a booth at the Kitsap Arts & Crafts Festival July 29-31 in Kingston, so I've been making a variety of items with the help of my friend and neighbor, Beth. She had many packages of a past Sale-a-Bration dsp called Delicate Dots that she wanted to use, so she ran the paper through the Big Shot on the Daisy die while I made many pouches. I'll be creating a free tutorial for the pouch this week, so come back later!


Here's a photo of the finished two-pocket pouch. I used a horizontal slot punch for the ribbon handles. Each pocket holds two notecards with two mini envelopes.


I stamped "just for you" from Teeny, Tiny Wishes on all of the notecards, because I figured then they could be used for any occasion. Hope you like it!

Friday, July 22, 2011

Field Flowers for Salt & Pepper Monkey Challenge 66


When I saw the cover of the Stampin' Up! 2011-2011 Idea Book & Catalog, I knew I had to have the Field Flowers stamp set shown on the cover. I think it's beautiful!


There's a Salt and Pepper Challenge (add spice to your life!) this week for A La Card Monkey, and I was eager to get some ink on this stamp set. You can see the sketch below. I love the sentiment, the Scallop Dotted Black ribbon, and the rhinestones. I'm going to use this card for my friend Bonnie's 89th birthday lunch tomorrow afternoon!

Thursday, July 21, 2011

Pennants for a happy day


Hello! I made more cards for my customers using scraps. The designer paper is Cheery Treat, a hostess pick. I stamped a phrase from Friendly Phrases and punched it out, adding it to punched pennants. Sweet and simple.

Wednesday, July 20, 2011

Embossed Vintage Wallpaper with butterflies


This is a thank-you card for one of my customers. I like to stick notes of appreciation in their orders, because they do mean alot to me!

I went to my scrap box for everything but the button. The card body is Wisteria Wonder, with a couple pieces of a Vintage Wallpaper-embossed Whisper White and a few Pink Pirouette butterflies from an embosslit for the Big Shot. I used a scrap of Pink Pirouette for the Dotted Scallop Ribbon Border, then added the button with some white Baker's Twine.

I'd used the embossed butterflies and vintage panels on a card I posted July 8. You can see the original card here.

Monday, July 18, 2011

Not So Seriously top dog card


This group of dogs is from a fun set called Not So Seriously. In addition to some cute images, there are some great phrases for outside - and inside - the card.


I started with a Cajun Craze card and added a Stripes-embossed layer of Not Quite Navy. You can see some of the Well Worn dsp on top of that. Did you see the new denim ribbon? I love it! I used Watercolor Crayons and an aqua painter to color in the dogs. Hope you like it! This is one of my club cards this month.

Friday, July 15, 2011

Button Buddies for Monkey Challenge 65: Buttons & Bows


This Button Buddies pig is the cutest! First, there's that nose. I added the nostrils with a black marker so they were visible through the button. (Just a side note: When you add Baker's Twine in the button, it looks like snot! Yikes.) I used the marker for the eyes too.

Did you notice the new Houndstooth embossing folder on the Melon Mambo layer? I used the debossed side. The dsp is from the Cheery Treat hostess pack, along with some Lucky Limeade ruffled ribbon. And the words? Well, they come from the Not So Seriously stamp set. The inside says: And I'm thoroughly enjoying it!

I used the sketch from A La Card Monkey. I love the little piglet and his soft pink snout! 
One last note: I've created my very first paid tutorial on a new tab above. Nobody's purchased it yet (I just added it minutes ago), and it's only $1.95. Let me know what you think! It's an adorable Flip-Flop Album, made with real flip-flops! It's great for all kinds of summer photos - of vacations, trips to the beach and waterparks, etc. I think it's a great gift for that hard-to-buy-for person in your life.

Easy Events, Button Buddies and Array of Sunshine cards


These three cards are all from a recent 10-card class I did earlier in the week.

Stampin' Up! has a cute new set called Easy Events that offers a sentiment with a graphic on a single stamp. I paired one stamp with a strip of designer paper from the Well Worn pack, and colored the image with markers (So Saffron, Cajun Crazy, Not Quite Navy, and Crumb Cake).


I love how cute and easy this Button Buddies card turned out. It's all Melon Mambo card stock and ink, as well as polka-dotted designer paper from the Cheery Treat pack (a hostess item). The sentiment is from a set called Friendly Phrases.


I like the bold styling of Array of Sunshine, a stamp set you may select with your hostess dollars. This card uses Rich Razzleberry and Old Olive inks, along with Whisper White card stock and designer paper from the Pocketful of Posies pack. The sentiment is from another hostess item called Perfect Words.

Thursday, July 14, 2011

Faith in Nature with Beau Chateau dsp


Here's another quick card for a 10-card class. It starts with Pink Pirouette card stock stamped at the top with En Francais background stamp. The designer paper is from the Beau Chateau pack. I stamped the pear from Faith in Nature (a hostess item) in Chocolate Chip ink on Very Vanilla card stock and added a bit of Pink Pirouette with a sponge dauber. That layer is adhered with dimensionals.

Pretty Postage card for 10-card class


I used Beyond the Garden dsp and the Pretty Postage stamp set for this quick and easy card. It uses the Postage Stamp Punch, as well as 3/8" Whisper White taffeta and Tangerine Tango ink and card stock on a Whisper White card.

Paper Rose Tutorial


I made up a quick and easy photo tutorial to show how this paper rose was made. It's adhered to the Blossom Box (new die for the Big Shot) with dimensionals.

Paper Rose Tutorial:

1. Punch 8 flowers using the Fancy Flower Punch

2. Spritz top side of each flower with water and crumple tightly. (I use Stampin' Mist because I always have it on my desk, and it has the bonus of smelling like roses!)

(Note: If you're using designer paper, don't spritz with anything. If you're using colored card stock, spritz both sides of the flowers.)

3. Open up flowers and stack them on each other. Then pierce a hole through the center and add a brad. It's a big stack, but you will be able to open the brad's legs on the back side.

4. Starting with the top flower, squish it into the center from both sides as tightly as possible. Repeat with the other 7 flowers, squishing each toward the center.

5. This is the tightly crumpled bud you should end up with.

6. Simply spread out the bud until it looks like you want - a beautiful paper rose.

Wednesday, July 13, 2011

Scaredy Cat Spectacular and Flower Fest swap

I'll be hosting a Scaredy Cat Spectacular on September 18. Participants will get the stamp set, 5 make and takes, enjoy a card contest with prizes, swapping, door prizes and a full lunch! Details are on under Classes on the tab above.


Frankie made this cheery Flower Fest swap using the Eyelet Border and Modern Label punches, as well as an Itty Bitty punch and a pearl.

I've started my Classes to Go with the Button Buddies stamp set. Click on the tab above to see the details. It's the first time I've offered something like this, so go easy on me. I'm open to suggestions! I just want to provide you with a handful of ideas for a single stamp set at a time.

Also, I may add a class this month. Right now, I'm keeping my calendar open so I can work on many projects for the Kitsap Arts & Crafts Festival at the end of the month in Kingston. Have a great day!

Tuesday, July 12, 2011

Flower Fest card and American Ink gathering


I expected low numbers at my American Ink team gathering Saturday, so I moved our get-together to a Mexican restaurant. This time of year, there are many people on vacation and who have family obligations. Still, we ended up with eight of us. It was fun! Kim brought the Flower Fest/Pennant Parade swap above.
 
For Kim's card, we inked up the flower stamps in Wisteria Wonder, then used a sponge dauber to wipe off the ink around the outside of each flower and sponged on Island Indigo (both are new In Colors). Notice the bitty flower and brad in the middle of each flower? The designer paper is free with hostess benefits - Cheery Treat.

If you'd like to attend an American Ink gathering to see what demonstrators do when they're together, we meet the second Saturday of every month. Just contact me and I'll hook you up! Don't forget - there's never been a better time to join Stampin' Up!. The starter kit is only $99 plus sales tax.

Monday, July 11, 2011

Flower-topped Blossom Box


I couldn't wait to try out the new Blossom Box die for the Big Shot. The instructions are clear (I was able to assemble the box correctly the first time through!) and it's a really cute favor. I used Cheerful Treat dsp (a hostess freebie with a qualifying $150 order) and tied on a tag (using a Tiny Tags stamp with the Medium Jewelry Punch) with White Baker's Twine.

To make the flower: Punch 8 Fancy Flowers, spritz with water and crumple up tightly. Unfold the flowers and pile them on top of each other. Poke a hole in the middle and insert a silver brad (it's a tight fit, but you'll be able to open the legs a little bit). Starting with the top flower, squish it all toward the middle as tightly as possible. Repeat with the other seven flowers. Then spread out the layers as much as you like!

Delicate Doilies with Swirls & Curls Verses


This card uses new Delicate Doilies stamps, along with In Colors Wisteria Wonder and Lucky Limeade, and Tangerine Tango. I CASE'd a card by Christy Fulk, changing the focal point. The rhinestones add bling. You can see the new Lace Ribbon Border punch - it's big, and very pretty! The sentiment is from the Summer Mini hostess set, Swirls & Curls Verses

Sunday, July 10, 2011

Fancy Fan Letterpress Plate with Love & Care


I changed the colors from a card created by Tiffany Bauer, and used the new Fancy Fan Letterpress Plate with Daffodil Delight Craft ink, along with the Love and Care hostess set in the Summer Mini (with Real Red and Old Olive colors). I ran scraps of Real Red card stock through the Big Shot on the Tasteful Trim die to get the big scallop border, then added a Teeny, Tiny Wishes sentiment with White Baker's Twine and a few pearls. I added "flower dust" with the Color Spritzer. It's a fun tool, if you haven't used it for awhile.

A merry Pennant Parade Christmas card


I had to pull out the Stamp-a-ma-Jig for this Pennant Parade card, but I think it was worth it! The card is Crumb Cake, with layers of Early Espresso, textured Cherry Cobbler, and Always Artichoke. I CASE'd this card from Deb Currier.

Friday, July 8, 2011

Merry Winter brings Christmas in July for Monkey Challenge 64


It's Christmas in July at A La Card Monkey, and I'm feeling it! I just received this Merry Winter stamp set, Letters to Santa dsp, and Cherry Cobbler scallop dots ribbon, so I had to play with all of it!

 
It's never too early to create holiday cards. I hope you'll take a look at the challenge below and create your own Christmas in July card, then upload it to http://alacardmonkey.blogspot.com/. I'm providing blog candy for the winner!

Just Believe embossed butterflies card


I enjoy making cards that may be used for many occasions, and I think this one fits the bill. I can see giving it to someone for her birthday, or bridal shower or wedding card, as a get well card, or a thank-you card.

I'd love to take credit, but that goes to Mary Brown, whom I CASE'd. I used Pink Pirouette card stock and Whisper White that was run through the Finial Press embossing folder. The butterflies are from an embosslit, with a single pearl on each for embellishments. The stamps are from the Just Believe set, one of my favorites.