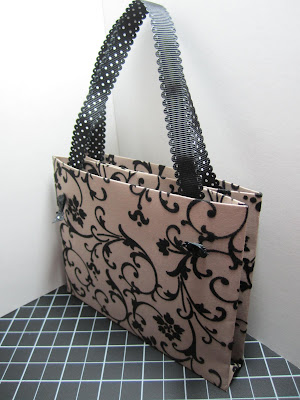
1. Score 1" on the left and right sides of a 12" x 12" piece of designer paper. I used Mocha Morning Specialty paper because I love the flocking!
2. Flip over paper and fold on the 1" lines you just scored. Adhere them down.
3. Add adhesive to one of the edges that doesn't have the folded back paper and roll the paper into a tube like this.
4. Keeping the seam in the middle, squish the tube flat then fold in half (seams together).
5. Open and lay flat the paper. Score at 4-1/2" and 5-1/2", then fold so the middle fold becomes a "mountain" and the other two are "valleys."
6. The bottom should look like a "W." Now adhere the top middle of each pouch to each other. It'll look like this from the side.
7. Cut 2 equal pieces of ribbon for the handles. I used 15" lengths of Basic Black dotted scallop ribbon for this pouch.
8. I used a Crop-a-dile to make 3/16" holes on the outside of each of the two pouches. I knotted one ribbon and fed it through a hole, then inserted it on the same side of the same pouch and knotted it again. Trim ends if necessary. Tie the other ribbon the same way, taking care to place the knots so the ribbon handles are equal.
Embellish your pouch as you like! And you can put anything from jewelry and candy to notecards inside the pouches.


5 comments:
Like your many projects ...this also looks fun ...think I might HAVE to give it a try.
great project and a great tutorial to go along with it...like that you posted tons of pics along the way...thanks for sharing!
How pretty! Thank you for the tutorial.
Great tutorial. I think I can do this!
Well isn't that just the cutest little bag. I like it. Have fun at your Kingston show this weekend. Hope you do well.
Post a Comment