My Stampin' Up! Classes

Showing posts with label American Ink. Show all posts

Sunday, October 19, 2014

Seasonal swaps, make and takes

 
This turkey punch card is so fun! When my club members saw it, they asked to make it next month. My friend and downline, Barb, brought this for a make and take at our American Ink team gathering last week.

 
My bestie, Kim, brought this Halloween swap. I love the colors!

 
Frankie brought this Christmas card swap - a little designer paper and fabulous ribbon with a great greeting is all you need!

 
Mary Ann's monochromatic Christmas card wins points for sparkle - both with Dazzling Diamonds glitter and the 1/8" silver taffeta and rhinestone.

 
We all need fall, masculine birthday cards. Mary Ann's make and take fits the bill.

 
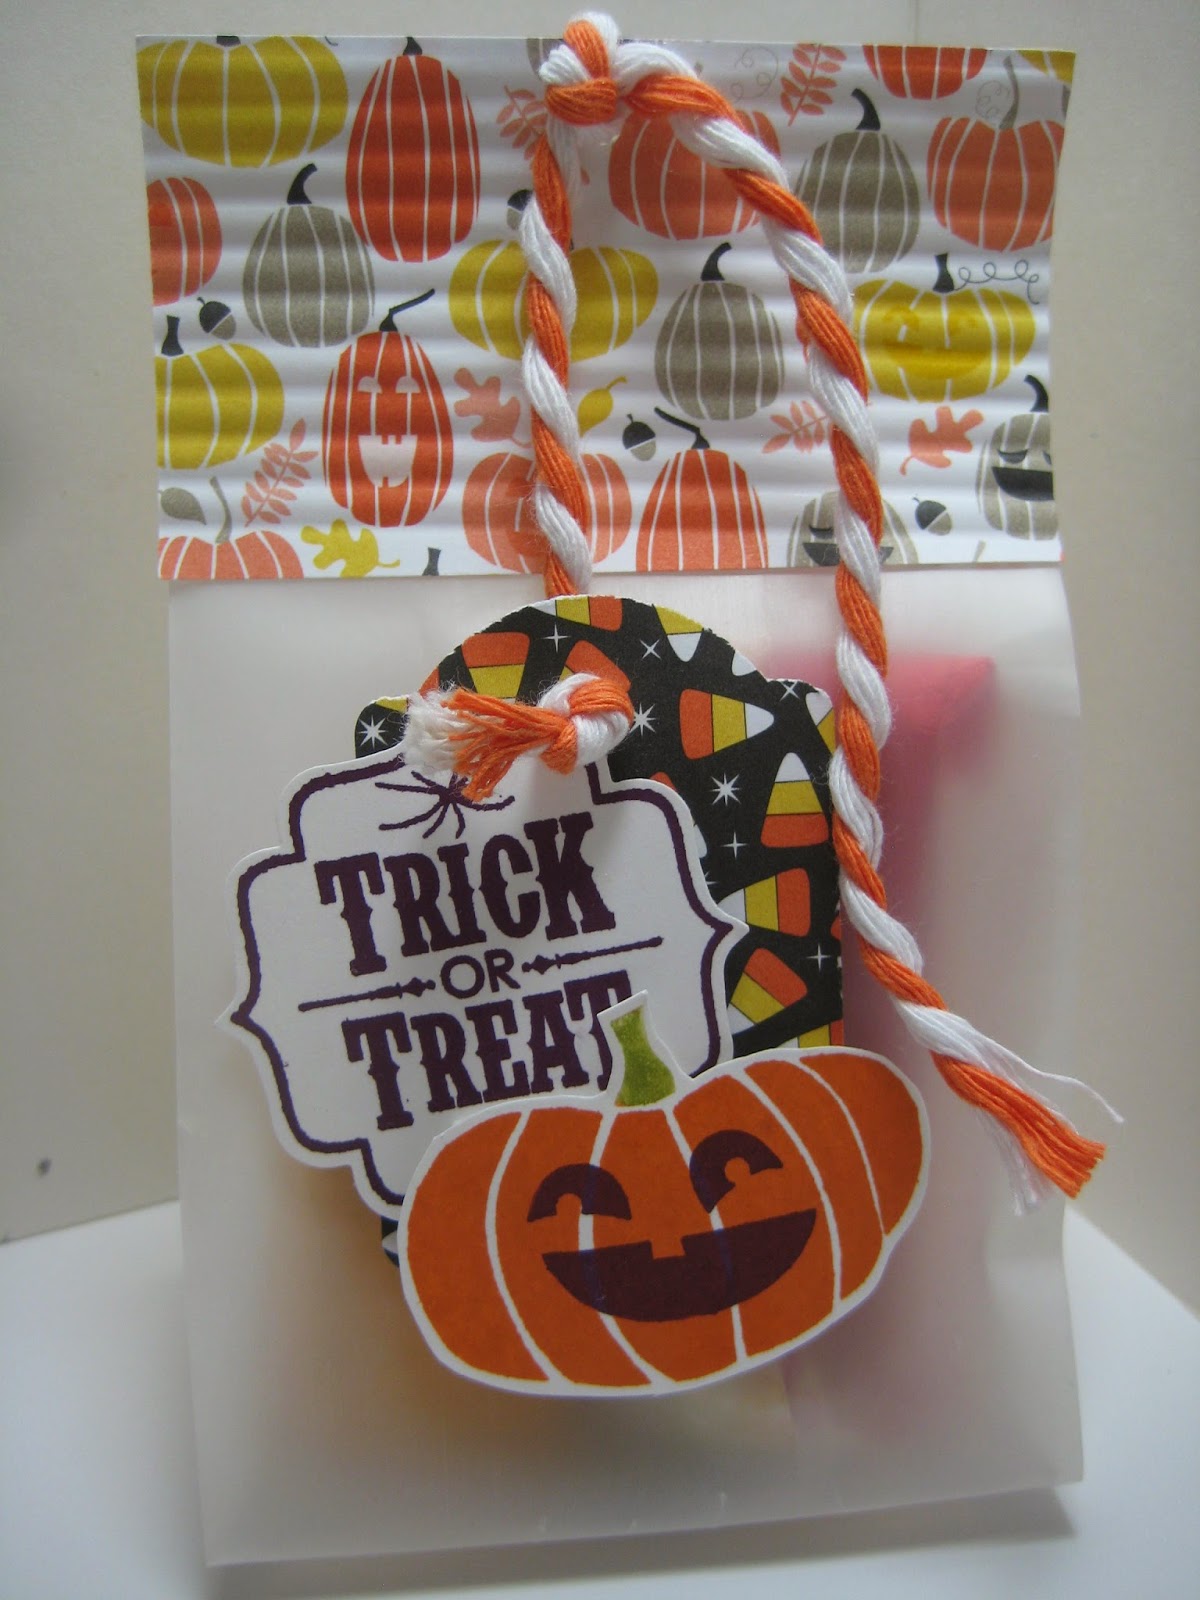
And who wouldn't love to get a festive treat bag like this one? Kim's make and take featured great stamps AND chocolate. Love it!
 
Our next team gathering is our annual Christmas party potluck and gift exchange the second Saturday of December. I can't wait to see what everybody makes!
 
I'm scheduling some posts for this coming week. I've got so many cards to share, but haven't had the time to share them! Happy Sunday!!!

Monday, June 23, 2014

Work of Art


I still have cards to share from my last American Ink team gathering in Port Orchard earlier this month. This card was brought as a make and take by Frankie. It uses the Moonlight paper stack, and new In Colors Hello Honey and Lost Lagoon. The sentiment is from the Work of Art stamp set (wood 134133, $29.95; clear 134114, $21.95).

I'm so proud of my son. He's taking driver's ed this summer and just got behind the wheel of a vehicle for the first time two weeks ago. He passed his first driving test, though it was stressful, he said. In addition, I've been gathering items from my home and studio for a garage sale. My hubby's leaving town for a few days, so I thought that'd be an ideal time to do it.

This summer is "light" for stamping. I have a card club meeting tonight, and will be doing a 20-card class July 12. I've got a fun road trip planned with my bestie next month. I can't wait!!!

I hope you enjoy this beautiful day and make the most of your week. As always, if you want to place an order, please visit my Online Store at http://therubberroom.stampinup.net. There are all kinds of fun, new things to play with!

Friday, June 20, 2014

Viewmaster card

 
I received this beautiful card in the mail for my birthday and couldn't have been more pleased! My friend and downline, Holly, made this Viewmaster card (see the semi-circle punched on the right? Take your finger to move the white part down to reveal the entire message. So cute!

 
I turned the "wheel" once to review another word. The stamp set is a new photopolymer set called Endless Birthday Wishes.

 
I love the vibrant color and layers Holly used, as well as the rhinestones.


I'm hanging onto this card. I know how difficult it is to make! lol

Thanks, Holly. You're the best!

Tuesday, January 21, 2014

American Ink swaps late but not lost!

 
Well, I'm just now catching up by taking photos of cards from my last American Ink team meeting. The top card was a make and take provided by Kim. She used two upcoming (next week!) Sale-a-Bration items - the banner punch and the stamp set See Ya Later.

 
Frankie used the Sweet Sorbet Accessory Pack - another SAB item - on this card. That's a stamped cork flower! Go figure. The accessory pack comes with 30 yards of twine (10 yards each of Crisp Cantelope, Pool Party, and Summer Starfruit). Frankie "fringed" the Pool Party twine.

 
Barb gave us a manly birthday make and take, I love sanding the Core'dinations Cardstock - especially with this Woodgrain embossing folder.

Monday, December 23, 2013

Gift you can make #7: Mason jar chandelier or centerpiece

 
A canning rack, six quart-sized Mason jars, a string of lights and you're good to go for making a unique centerpiece, or, add a chain like in the photo above, and you have a chandelier! My bestie, Kim, frosted the jars and added snowflakes and tons of SU! rhinestones that sparkle and shine when this is plugged in (sorry, no photo of that yet!). I'm going to be using this as a centerpiece on my table for our Christmas dinner.
 
 
My best bud, Kim! It's funny that we ended up with each other's handmade gifts at our holiday party.
 
So there you go - some of my American Ink team members and I have given you seven ideas for gifts you can make your friends and family this year (or next). There's still time to make them before Christmas! Hope you enjoy your Sunday. The kids and I are baking and decorating sugar cookies today. Fun stuff!

Sunday, December 22, 2013

Gift you can make #6: A snowflake and burlap wreath

 
Burlap goes with anything, it seems. Above, my friend and fellow Stampin' Up! demonstrator, Heather, holds a burlap wreath with Festive Flurry snowflakes that Barb made. Barb even included an additional ornament she made using the big rosette die for the Big Shot.
 
I'm looking forward to making Christmas sugar cookies and other baked goodies with my family today. I hope you enjoy your Sunday!

Saturday, December 21, 2013

Gift idea you can make #5: Fabric organizer

 
We all have items that accumulate and start taking over craft areas, countertops, etc., so why not make a fabric organizer you can throw in the wash when it gets dusty or dirty? My friend and downline, Frankie, went home with three such organizers that Bonnie made. And guess what? There's fabric on Stampin' Up!'s Clearance Rack! So you can get good fabric at a low price to make your own organizer.


This is Bonnie. She chose Mary Ann's sparkly earrings and necklace.

Friday, December 20, 2013

Gift idea you can make #4: Ornaments

 
Ornaments make everything more fun and festive! My friend and downline, Cindy, is holding up the ornaments Heather made for our gift exchange recently. The left one is from the Festive Flurries Ornament Kit (they're still available), and the second is made using strips of Stampin' Up! designer paper, curled with a bone folder!


Thursday, December 19, 2013

Gift idea you can make #3: Snowflake shadow box

 
My friend and downline, Barb, is holding the gift she ended up with at our team party - Cindy's snowflake shadow box.


This is a better photo of the shadow box. It has lots of sparkly detail! The shadow box may be purchased at a craft store, then it's all Stampin' Up! ribbon, stamps, paper, and framelits.

Wednesday, December 18, 2013

Gift idea you can make #2: Paper magnet star

 
My American Ink team member and friend, Mary Ann, was happy to get this star created by Frankie from our annual Christmas party gift exchange Saturday. Each half of a star point is covered with Stampin' Up! designer paper and magnet sheet, so they're removable (or you could make points for each season!). The metal star was purchased at a craft store. What a great holiday decoration!

Monday, December 16, 2013

Gift idea you can make #1: Sparkly snowflake earrings

 
What a great pair of holiday earrings! They are so sparkly and radiant - who'd guess they were made using some Stampin' Up! embellishments? I love them. This is what I made for the gift exchange at my American Ink group's annual Christmas party that was on Saturday. I even made myself an extra pair.
And Mary Ann made a pair of earrings AND a necklace! Fun!!!
 
Frosted Finishes Embellishments (12 pieces): Item 132150, $6.95
 
You may order these thru January 2, 2014, via my Online Store at http://therubberroom.stampinup.net. Use this hostess code - 3XTCDNG6 - and you'll be entered into my January 1 drawing for free Stampin' Up! product of your choosing.

Wednesday, October 23, 2013

American Ink swaps and 3d Halloween share

 
I love getting together with members of my American Ink downline to stamp, swap card ideas, share stamping tips and tricks, eat and chat. It's always a good day when we're together! It's already been almost 2 weeks since our last demo meeting, so I'm a bit late with these swaps, but I wanted to share.
 
Above, Frankie CASE'd a punch art bird card (who doesn't love punch art?) with 1-3/8" and 1-1/4" and 1" circle punches, and the Bird Builder punch.

 
Ginette's Melon Mambo card used the Fancy Fan embossing folder, butterflies and rhinestones.

 
Mary Ann used the Label Thinlit to create an adorable Halloween card inside and out in Pumpkin Pie and Basic Black.

 
The ghosts are simply upside down owls from the Owl Builder Punch!

 
Now for my share today, I have this eerily cool Halloween spool doll my friend Kim made me. The wooden spool has black ribbon on it, with a little African pod that looks like a tiny pumpkin. How cute is that? Kim went all out on the distressed tulle (with a heat gun) and black glitter on the detailed wings behind the torso. The front and back are stamped! One more homemade Halloween decoration to add to my collection. I love it!

Saturday, October 12, 2013

Halloween Happiness and a creepy spice doll

 
It's a great day to get together with my fellow Stampin' Up! demos to stamp, swap cards, eat, chat and more!
 
This is my swap (a card to trade with other demos who've also made a number of the same design). It uses the single stamp Halloween Happiness from the Holiday Catalog. I started with a Basic Gray card and layered a 4" x 5-1/4" piece of Witches' Brew designer paper on top. I first stamped the pumpkins in Jet Black StazOn on Very Vanilla card stock, then diecut the image using a Deco Label framelit. I stamped the image a second time in Pumpkin Pie and cut out the word "halloween" and just the one pumpkin (adhered with dimensionals). The final touch - a bow of Summer Starfruit ribbon.

 
My family carved its own pumpkins last weekend. There's quite the variety. My youngest niece (age 7) drew and carved the far right pumpkin. And her mom made the small white pumpkin look like swiss cheese! I even roasted some pumpkin seeds and added some red pepper flakes for a little kick. They were delicious!

 
My crafty friend, Kim, created this spice doll, as I'm calling her, using vintage items with a SU! paper cone hat.

 
I love hand-crafted Halloween items. I've been focusing more on those this year - such as the sampler and Spooky banner I've made already. Isn't this spice doll fabulous? I love it! I keep moving it around the house. Right now, it's on the kitchen windowsill. Thanks so much, Kim! You're one talented lady!!!
 
Don't forget - you may order any Stampin' Up! item thru my Online Store at  http://therubberroom.stampinup.net. Use my new hostess code for October - VEHSYQRR - and you'll be entered into a drawing for the hostess goodies at my Nov. 1 drawing. Thanks!


Tuesday, September 17, 2013

American Ink swaps and vintage lamps

 
This is Frankie's flowers and butterfly swap. I love all of the dimension!

 
Barb went with a monochromatic look for her swap.

 
And Ginette used her favorite colors for her swap.
 
No matter if you're a new or seasoned stamper, there's something for everyone in my American Ink group of Stampin' Up! demonstrators. We meet the second Saturday of every month at my studio to swap card ideas, stamp cards brought by volunteers, eat, share business tips and ideas, and chat. It's fun!
 
REMINDER: Wednesday is the last day to let me know if you'd like to attend my 20-card Christmas class this Saturday at 11 a.m. Bring adhesive - I'll provide envelopes and light refreshments.
 
You may order all of the products used on these swaps, along with Clearance Rack items, via my Online Store at http://therubberroom.stampinup.net. Please use this hostess code to be entered into a drawing for FREE hostess goodies - AKS76R6P.

We've already lost a couple hours of daylight heading into the fall. I love my light! I've picked up a couple of vintage lamps to brighten your day.

 
I think this would look perfect on a nightstand. The lily pad base is unique with the gooseneck. Price? $21. See more at http://www.facebook.com/booth6goods.
 
 
This antique lamp features hand-painted details and a metal shade. I added a few lightbulbs and plugged it in - lovely! Price: $42. Enjoy your day!


Tuesday, August 13, 2013

Halloween Hello, Evergreen, & Label Love make & takes

Halloween Hello by Frankie White
 
Spending the weekend stamping with friends is a wonderful way to spend time. I adore Halloween! I know it's not a big card-sending holiday, but it's so much fun to make them - especially with this Halloween Hello set. Frankie's card uses Witches' Brew designer paper, the ultrafine orange glitter and Witches' Brew Designer Washi Tape in the Holiday Catalog, and burlap ribbon that was cut in half and then frayed. Those are glitter brads too.

Evergreen by Heather Williams
This card makes great use of paper scraps. On the right, there are smallish rectangles from the Seasons of Style designer series paper stack (page 22 in Holiday Catalog, $6.95 and Item 132181). It's a great way to get a variety of card-sized patterns for crafting.

Label Love by Mary Ann Huntington
This card is so simple and striking in person. It feels classy. The strips are from the Modern Medley dsp pack, with a bow of 1/8" Basic Black taffeta and a sentiment from Label Love punched with the Artisan Label punch.
 
I have more make and takes I'll take photos of tomorrow to share with you.
 
My Special: Order the Tag It (Item stamp set from me by August 31 and you'll get your name entered into a drawing for the Pretty Print Textured Impressions Embossing Folder in the Holiday Catalog. I'll announce the winner on Sept. 1 AND if you use the following hostess code, you'll also be eligible to win the hostess benefits - GGQ2GJ3A.
 
Order anytime via my Online Store at http://TheRubberRoom.stampinup.net. Thanks!

 
My niece and I visited a local garage sale recently and found lots of cool tins. I thought I'd share a few with you today. I love the look of these. They'll hold anything too! If you'd like to see more of our vintage finds, please feel free to "Like" us on Facebook - http://www.facebook.com/booth6goods.

Chalk Talk, Christmas and Tag It swaps

Chalk Talk by Kimberly Becker
I hosted a stampin' retreat at my studio this past weekend, and an American Ink team meeting too. Everyone stayed all day. Here are a few swaps to share. This first one uses the Chalk Talk Framelits and coordinating stamp set, along with Etcetera designer paper.
Northern Flurry by Frankie White
My photo doesn't do justice to the strip of shiny designer paper at the top of this card. Frankie used the Northern Flurry embossing folder and Festive Flurry framelits to diecut an embossed snowflake she adhered over the embossed card front.

Tag It by Heather Williams
Birthday Basics designer paper shines on this Tag It card. Heather used the Chalk Talk framelit to diecut the image after inking it with markers.
 
Remember: Order the Tag It stamp set from me by August 31 and you'll get your name entered into a drawing for the Pretty Print Textured Impressions Embossing Folder in the Holiday Catalog. I'll announce the winner on Sept. 1 AND if you use the following hostess code, you'll also be eligible to win the hostess benefits - GGQ2GJ3A.
 
Order anytime via my Online Store at http://TheRubberRoom.stampinup.net. Thanks!


I picked up this little vintage item at an estate sale. It looks like a mini toothbrush holder! I'd asked several people, but I found a photo and description online today. My treasure? A vintage brass lipstick holder! It makes sense now that I know what it is. lol


Monday, July 29, 2013

Pure Gumption is perfection for a folding graduation card

 
I think this card is lookin' fine for a great graduation card. Sure, most graduations are over, but it's never too early to make a card or two to keep in your stash for a graduation a year or two down the road. My friend and downline, Mary Ann, brought this card as a make and take to our last American Ink gathering. The sentiment is from Pure Gumption on page 52 in the big catalog. We stamped that first before running the Whisper White layer through the Big Shot in the Fancy Fan embossing folder. The hat is two red pieces of card stock cut 2" square, with a silver mini brad holding the twine tassel.


Ha ha! I took this photo upside down by mistake with my phone! Anyway, you can see how the inside of the hat is stamped, and there's a third sentiment inside the card. The inside of the hat is a white square that was folding in half each way, then folded on one diagonal. You push in the diagonal score lines so one square lines up with the other. I hope that makes sense!
 
My 20-card class was fun Saturday. I'll be posting those 10 card designs this week. I'm playing with clay today for a club project and will have those club cards to post too.
 
To order anything you see here, please visit my Online Store at http://TheRubberRoom.stampinup.net. There's still the Buy 3, Get 1 Free Designer Series Paper special, as well as the Undefined Stamp Carving Kit for $19.95, and other new products here. Contact me if you have any questions or need some information (tblaisink@gmail.com). Enjoy your day!


Sunday, July 21, 2013

Papillon Potpourri in blue and green

 
My friend and downline, Barb, made this striking Papillon Potpourri card for her American Ink team gathering swap last Saturday. I love that she used the Flower Garden embossing folder and adhered the punched butterflies over it with dimensionals. This is definitely a color combo I'll file away to use in the future. I love it!