My Stampin' Up! Classes

Tuesday, August 28, 2012

Googly Ghouls for Week 5 of The Great Pumpkin Blog Hop and WOYWW

 
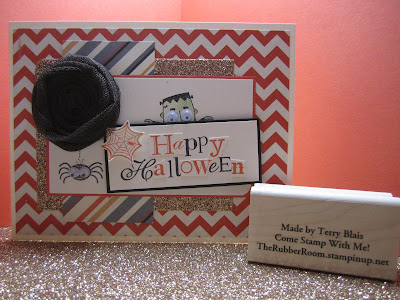
Welcome to Week 5 of The Great Pumpkin Blog Hop. I'm glad you're joining me for my first Googly Ghouls card! I loved using a couple pairs of googly eyes for this card, as well as the little web from Spooky Bingo Bits.

 
I started with a Very Vanilla card, Howlstooth & Scaringbone dsp, Champagne Glimmer Paper, and a sentiment from Wacky Wishes (hostess set). I also used this sketch from Create with Connie & Mary.


2012 Create Challenges-031This Create with Connie & Mary sketch challenge closes Wednesday, August 29 at noon (EST). At least I was on time for this one!
I enjoyed making an Early Espresso scalloped tulle flower for my card. I used a Jumbo Sticky Round, but it was too big for what I wanted, so I punched a scallop circle out of the middle and peeled off the pink layer to start my flower.


I folded the tulle in half and twisted it, adhering it to the center of the circle. Then you just keep twisting the tulle and going around in a circle. Any ends may be tucked under at the end, when you peel off the back side of the Jumbo Sticky Round.


Here's a closer shot of the card. You can see some rounded corners, how Frankie is green (he's darker in person) and holding the Happy Halloween sign, and the "ransom" letters on the sentiment, which I think is a cute touch!


Each week, you're invited to add your Halloween creation to my blog hop, along with the code near the bottom of each post. When you add the code to your blog while you are in the edit HTML mode, your readers can play along, leave comments, and view the samples right from YOUR blog!

At the end of 13 weeks, I'll be giving one person a $50 Stampin' Up! gift certificate! The more times you enter the blog hop, the better your chances of taking home the Grand Prize. You also get a ticket just for displaying The Great Pumpkin Blog Hop badge on your blog. Whoo hoo!

Oh, and just one more thing - I'm adding this to What's on Your Workdesk Wednesday (WOYWW). I haven't played along in ages. It's fun sharing just how messy a desk gets while crafting. Here's mine:

 
I had to mount my Googly Ghouls set before I could use it! You can see a pile of clear stamps on the left with my fan (a necessity since it's hot in the loft), some leftover items from my bat popcorn cover (I do plan on making more!), and wipes, black StazOn and refill, containers of brads and mini glue dots.

Sunday, August 26, 2012

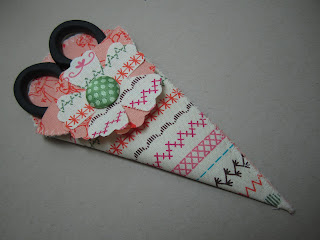
For Sale: SU! fabric scissor holders (snips not included)

After showing a photo of a fabric holder for paper snips (scissors) here, I've had many inquiries as to whether I've got them available for purchase. Well, I do. And I've sold and shipped several already. I have 15 NONE available right now, but I'm working on more! I'm offering them for $10 apiece, with $1 shipping in the U.S. and Canada, and $3 shipping to Europe and Australia/New Zealand.
 
Please email me at ericandterry@comcast.net with which fabric holder(s) you'd like. I can accept payment via Paypal, check, or credit card. Thanks!
 
 
Sweet Stitches with blue fabric button


Sweet Stitches with green fabric button on button flower


Sweet Stitches with green fabric button on stitched flower


Sweet Stitches with pattern button on orange flower


Comfort Cafe with antique brad


Summer Smooches with antique brad


Sweet Stitches orange body with green fabric button


Sweet Stitches with pink fabric button


You can make your own scissor holders. There's still some fabric on the Clearance Rack for 99 cents (Sweet Stitches, Deck the Halls, Candy Cane Christmas), and Holly Beary Bouquet for $3.99, for three fat quarters, with coordinating buttons. Here's a list of what I used:

SU! Supplies:
113439 Big Shot Die-cutting Machine $99.95
121810 Petal Cone Bigz L Die $32.95
121812 Fun Flowers Bigz L Die $32.95
122194 Fabric Adhesive Roll $14.95
117273 Antique Brads $5.95
125411 Summer Smooches fabric $9.95 (optional)
126894 Comfort Cafe fabric $9.95 (optional)
103579 Paper Snips $9.95 (of course!)

Misc. Supplies:
Iron
Crop-a-dile
Sewing machine (or you can hand-stitch)

I'd love to be your SU! demonstrator if you don't already have one. Simply select me when you make your Online Order and you'll receive preferred pricing.

American Ink swaps features techniques and new products

At our American Ink team gathering just over a week ago, we shared everything from Memento Mall items, general session news and prizes, class tips and more. It was a jam-packed afternoon. We also discussed the upcoming SU! Regional Seminar (there's still room, and if you'd like to attend as a guest, it's $75, and you need to have a demonstrator sign you up. The seminar is Sept. 29 in Tacoma.)
 
Special thanks to Ginette for demonstrating a Workshop Wow! - the ornament from the cover of the Holiday Catalog. We were all laughing and having fun!
 
I know I didn't get photos of all of the swaps or make & takes. I'm sorry about that! Here are the ones I did get:
 
Puddin's swap uses a fun watercolor technique and the Apothecary Accent Framelits with the Tea Shoppe stamp set.
 
Kim's make & take uses Core'dinations Card Stock and Labels Framelits.
 
Barb's Frightening Feline swap uses new ribbon and Howlstooth & Scaringbone dsp with the Chevron embossing folder.
 
Kim's Perfectly Preserved swap uses the Windows Framelits, Orchard Harvest dsp and Argyle embossing folder.
 
Frankie's Googly Ghouls embossed swap uses the Doily sizzlit and Perfect Polka Dots embossing folder.
 
Guest demo Kathleen's swap (sorry it's blurry!) uses Mixed Bunch and Teeny, Tiny Wishes.
 
Our next team meeting is the 2nd Saturday of September at 11 a.m. at my studio. If you'd like to attend as a guest, please contact me at tblaisink@gmail.com.

Bea's embossed Tricky Treats card

 
One of my friends and downline, Bea, made this adorable Tricky Treat cards. I love the web-embossed panels of color, as well as the googly eyes on the spider. I'm adding this to The Great Pumpkin Blog Hop from here because Bea doesn't have a blog.


Saturday, August 25, 2012

This tri-shutter birthday card is all about the birds

 
Birds of a Feather designer paper rocks! It's got a great variety of patterns you see on the Crumb Cake tri-shutter card above - birds in cages, eggs, cute little birds and lovely patterns.
 
 
My club members made this card this month. I used the Apothecary Accents Framelits and Basics Glimmer brads after inking the Raspberry Ripple sentiment, which is from the You're Amazing stamp set.
 
 
 I paper-pieced the chicks' shells, then colored them with Summer Starfruit and punched out the image with the oval scallop and added it to the card with dimensionals.
 
Of course I just made a tri-shutter Christmas card using Scentsational Season and coordinating framelits. You can see that here.
 
If you'd like to order any of the Stampin' Up! products used for this card, please visit my Online Store (open 24 hours a day) at http://TheRubberRoom.stampinup.net. Thanks!


Stamps: Take Care (126310 wood $17.95 or 126312 clear $13.95), Flock Together (126730 wood $15.95 or 126732 clear $11.95), You're Amazing (126720 wood $30.95 or 126722 clear $22.95);
Ink: Summer Starfruit, Raspberry Ripple, Crumb Cake, Marina Mist, Primrose Petals;
Paper: Whisper White, Crumb Cake, Birds of a Feather dsp (126899 $10.95);
Accessories: Oval scallop punch (119856 $16.95), dimensionals (104430 $3.95), Apothecary Accents Framelits (127003 $24.95), Neutral Buttons (119743 $8.95), Whisper White Baker's Twine (124262 $2.95), 3/8" Basics Glimmer Brads (121003 $4.95).

Wednesday, August 22, 2012

Week 4: Goin' batty over microwave popcorn for Halloween treat

You made it! Thanks for being here for Week 4 of my 13 weeks of Halloween fun with The Great Pumpkin Blog Hop.
 

It took me awhile to get this on my blog today because I was working on a free tuturial for it. I should've done it last night, but I got caught up reading the second book in the Hunger Games trilogy instead of stamping last night. My bat is the cover for microwave popcorn (according to my hubby, the more butter, the better!). Edited to add: There's already a popcorn packet in the bat pictured. The one in front is just to show you what kind I used. I left the plastic on!
 
 
I actually got the idea for this bat from seeing a snowman-decorated microwave popcorn wrap on Pinterest. Here are the punches I used - the 1/2" and 3/4" circles for the eyes, and the Pennant Builder punch for the ears and teeth. I also used the small oval we have (that's current in the SU! catalog) to make the curves on the bat wings. I also used a black marker and white gel pen for the face.
 
 
My bat uses one 8-1/2" x 11" piece of Basic Gray card stock. The body is 5-3/4" x 11" and the leftover piece gets cut in half for the wings. Of course if your popcorn is a different size, you'll have to make adjustments.


I used the top of one of my tote lids for the top curve of the bat wings, tracing it on one, then lining them up on top of each other and cutting them together.

 
Insert the bottom part of one wing in the oval punch halfway. I lined up the one I punched first over the unpunched one so I could match them perfectly.


From here, I ran the wings through the Chevron folder for a trendy look, then sponged around all of the edges and over the raised Chevron design.
 
 
The wings are attached in the back with Sticky Strip along the seam (also held together with Sticky Strip). I used a dimensional to hold my wings together just because I think they look really cute like that and because I'm going to pack them tightly in a box for a craft fair I'm doing in mid-October in Tacoma.


Each week, add your Halloween creation to my blog hop, along with the code near the bottom of each post. When you add the code to your blog while you are in the edit HTML mode, your readers can play along, leave comments, and view the samples right from YOUR blog!

At the end of 13 weeks, I'll be giving one person a $50 Stampin' Up! gift certificate! The more times you enter the blog hop, the better your chances of taking home the Grand Prize. You also get a ticket just for displaying The Great Pumpkin Blog Hop badge on your blog. Whoo hoo!

Tuesday, August 21, 2012

Scentsational Season tri-shutter card for Christmas


Who wouldn't love to get a card that is fun to open and has an adorable gingerbread man greeting you with Christmas cheer?


This 5-1/2" x 12" Chocolate Chip card features the Scentsational Season bundle (stamp set and framelits on page 16 of the Holiday Catalog), as well as the Heart of Christmas stamp (featured in the top photo) and Snow Festival designer series paper. I also used the snowflake from the Mixed Medley hostess set, as well as a few rhinestones.

There's a how-to on Splitcoast Stampers (http://splitcoaststampers.com) under Tutorials. Basically you score the card stock at 2", 4", 8" and 10", then turn it so it's vertical and cut 1-1/2" from the left and right sides between the 2" and 10" score lines. Then you cut your designer paper to fit!


This is what the card looks like closed. Isn't it cute? And to think I didn't have to cut out a single image! There's a framelit for every stamp in the Scentsational Season stamp set.

Well, I've got a class and a club today, so I've got to get going. I hope you have a wonderful day!


Monday, August 20, 2012

Warm Winter Memories ice skate card for Christmas


Snow and ice skating are a long ways off, but I love this stamp set called Winter Memories you can find in the Holiday Catalog on page 19. It's a 5-piece stamp set and I used two of the stamps - the ice skates and the sentiment - for this card.

My favorite part of this card is the label framelit diecut from Early Espresso Core'dinations card stock. After embossing it, I sanded it. I think it looks spectacular! This was one of four cards at my Express Christmas Workshop last week.

Stamps: Winter Memories;
Ink: Early Espresso;
Paper: Very Vanilla, Early Espresso, Candlelight Christmas Specialty Designer Paper, Early Espresso Core'dinations Card Stock;
Accessories: 1/8" Early Espresso taffeta, Neutral brads, dimensionals, sponge dauber, paper piercer and mat, labels framelits, Northern Flurry embossing folder.


Snow Festival paper and mitten bring Wacky Wishes to life


Snow Festival designer series paper ROCKS! I love all of the great patterns and colors. This was another of my cards for the Express Christmas Workshop last week. Stamp a couple things, punch them out and stick 'em on and you've got a cute Christmas card!

Stamps: Wacky Wishes (hostess), Make a Mitten;
Ink: Cherry Cobbler, Gumball Green;
Paper: Whisper White, Cherry Cobbler, Snow Festival dsp;
Accessories: 2-1/2" circle punch, Mitten Builder Punch, Gumball Green stitched ribbon, dimensionals.

This Christmas card uses all of the Merry Minis!


I love the simplicity of this card. It uses the Merry Minis stamp set, Merry Minis Punch Pack, and the 1" and Postage Stamp punches, along with the Extra Large Scallop edgelit.

To make the card a little bit special, the card body is Shimmery card stock, so it sparkles in real life. I also love the stitched Wild Wasabi ribbon. The colors came right from the Color Coach - Rose Red, Wild Wasabi and So Saffron.

If you'd like to order the items used to make this card, please visit my Stampin' Up! website at http://TheRubberRoom.stampinup.net and click SHOP NOW. There are still some great Clearance Rack products too.

Sunday, August 19, 2012

Wonderful Winterland penny spinner card


Bear with me as I write several posts today. I have been taking photos and getting things organized in my stamp area in preparation for another busy week. I have many more Christmas cards to post. I'm not all about Halloween, though I do enjoy it!

I love cards with movement! And this penny spinner Wonderful Winterland card is so fun and easy to make. This was one of my club projects this month.

I started with a Baja Breeze card, running the front through the Big Shot in the Perfect Polka Dots embossing folder. Using the Apothecary Accents Framelits, I diecut this oval-like shape from Snow Festival dsp, then used the Word Window punch to punch through both layers 2+ times, making a track on which the spinner will rest.

The spinner is a penny, two dimensionals on top of each other, and a second penny. Then I stuck two dimensionals side by side on the outside of one penny and stuck it to the back middle of my "medallion" - the kid innertubing. I used a combination of markers and ink pads with a blender pen to color the image, outlining the entire thing in Sahara Sand to make the other colors pop.


Order 24/7 from my Online Store: http://TheRubberRoom.stampinup.net;

Get a FREE Halloween Project Kit when you buy the Starter Kit for only $99 plus tax thru August 31, 2012. You can fully customize your kit thru my SU! website.

A So Sorry card for so many occasions


This brayered So Sorry card was a club project from last month. I love brayering as a technique. It covers the surface quickly and easily. I used glossy white card stock for the brayered layer, first brayering the entire piece with Daffodil Delight ink, then going back and adding Pumpkin Pie ink from the top and bottom to make a sunset of sorts. A punched circle from a sticky note makes a nice mask for the sun.

After that, I stamped the sentiment and image from Serene Silhouettes in Basic Black ink. I left the inside blank, so this could be So Sorry times are tough right now, or So Sorry for the loss of your beloved pet, So Sorry you've been ill, or even So Sorry this is late. There are many options available.

Heidi's card here inspired mine.

Stamps: So Sorry (Item 126525 wood, $21.95 or Item 126527 clear, $16.95), Serene Silhouettes;
Ink: Daffodil Delight, Pumpkin Pie, Basic Black;
Paper: Whisper White, Glossy White, Pumpkin Pie, Early Espresso;
Accessories: Scallop trim border punch, 1-1/4" circle punch, rubber brayer

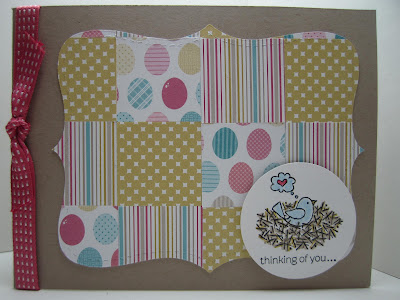
This quilted Top Note card is For The Birds


I love the little birds in the For The Birds stamp set. I used markers to color this image before punching it out with the 1-3/4" circle punch.


My club members made this card last month. It uses a quilting technique. We punched squares from Birds of a Feather dsp, adhered them to a quarter sheet of bond paper and then ran it through the Top Note die and Big Shot. It looks like a pretty, quilted blanket! And the stitched Raspberry Ripple ribbon is so soft.

Tuesday, August 14, 2012

Frightening Feline frame is Wicked Cool and lots of fun!


I'm so happy you're here for Week 3 of my 13 weeks of Halloween fun with The Great Pumpkin Blog Hop. I've got a fun home decor project this time around.


Each week, add your Halloween creation to my blog hop, along with the code near the bottom of each post. When you add the code to your blog while you are in the edit HTML mode, your readers can play along, leave comments, and view the samples right from YOUR blog!

At the end of 13 weeks, I'll be giving one person a $50 Stampin' Up! gift certificate! The more times you enter the blog hop, the better your chances of taking home the Grand Prize. You also get a ticket just for displaying The Great Pumpkin Blog Hop badge on your blog. Whoo hoo!


I wanted to create a Halloween decoration for my studio that is uniquely Stampin' Up!. I bought a wood frame for a buck at a craft store, traced it onto Howlstooth and Scaringbone dsp and cut it out. I used Mod Podge to adhere the dsp to the frame.


I stamped a couple of cobwebs on the frame from the Wicked Cool stamp set, then sponged around the frame with Basic Black ink. I traced the inside of the frame onto First Edition dsp, cut it out and heat embossed the Frightening Feline stamp in Basic Black ink (the new foam pads are juicy enough to do this!). To finish, I made a Spooky banner with a fun, twisted Crumb Cake tulle flower as decoration with a Neutral button and linen thread.

I've shown you my Halloween project - now show me yours! You've got until next Tuesday at 1 p.m. (PST). I can't wait to see what you come up with.


Sharing cards from a couple of new friends


I want to share a couple of cards with you today from new friends. The top one is from a 14-year-old girl named Sahara. I met her at the Kitsap Arts & Crafts Festival a few weekends ago, and then she came to visit me at my studio. I gifted her with some stamps, inks and paper. She loves crafting! There's no minimum age! Sahara sent me this adorable thank-you card.


Kathleen is a new friend of mine from Silverdale. I love how elegant this card looks with the black and white palette and the embossing on the butterflies and card front. Lovely!

Having friends like these reminds me how crafting has brought some wonderful people into my life. I'm extremely grateful!

Monday, August 13, 2012

Visiting the parts bin to make this pretty jewelry


After seeing this idea on Pinterest, then in the latest issue of Stampin' Success, our demonstrator magazine, I felt the universe was telling me to make washer jewelry. So I raided my hubby's parts bin last night, selected a pack of my favorite designer paper - International Bazaar - and went to work.

I think they look like jewels here! Two of these have Howlstooth & Scaringbone dsp.

First, there were several different sizes of washers, and a nut (there's one in every bunch!). I figured most of the middles were about the size of the circle in the Itty Bitty Punch Pack. The middle circle was punched first, then I used either a 3/4" or 1" circle to punch out the ring that would cover the washer.

I used Tombow Liquid Adhesive to adhere the designer paper to the washer. Once it dried, if the paper was too large, I simply turned over the washer and used scissors to trim off the excess. It's easy because the scissors runs smoothly along the metal edge.

After the paper was adhered, I used Crystal Effects over the entire surface. That's it! I let them all sit overnight, and then added white baker's twine to several today.

I love this color of blue.

Hexagon nut

For the hexagon shape, I used the 1" square punch, glued it down and then once it dried, turned it over and trimmed off the excess. It was very easy to follow the straight lines!


So I'd like your input. I'm thinking about making more of these for a holiday gift festival in October. How much do you think I should sell one for?