Saturday, October 31, 2009
Berry Christmas...
It uses the Berry Christmas stamp set, Real Red and Old Olive ink pads, and some Mistletoe ribbon (available in the Holiday Mini).
I used scraps of Real Red card stock with the Merry Details Sizzlets die for the Big Shot to get the bird. Then we stuck it on with a dimensional.
Friday, October 30, 2009
Patterned Pines...
For a recent stamp-a-stack, we stamped the trees in Sahara Sand on Whisper White card stock, used the Ticket Corner Punch and then sponged around that layer, as well as the entire card.
We added a piece of Christmas Cocoa paper - also with punched corners - and Vintage brads, and then added the greeting from the Christmas Greetings stamp set on the front and inside the card.
Thursday, October 29, 2009
Good Cheer...
The main image was stamped in Soft Suede, torn on all four edges and sponged and then layered on Soft Suede card stock with a loop of coordinating ribbon on the left.
I stamped the branch from the set in Always Artichoke.
Wednesday, October 28, 2009
Big Shot faux alligator purse...
I'd love to take credit for it, but I CASE'd it from Gretchen Barron.
This project takes 3 Top Note diecuts and one Box #2 diecut. Mine are all Dusty Durango card stock, with polka-dotted Dusty Durango ribbon, a filigree flower with a fire rhinestone brad and Velcro for the closure.
Here's the Faux Alligator Technique: Cover your card stock with VersaMark ink, and cover with Clear Embossing Powder, tapping off the excess. Then using your bone folder, make wavy lines vertically and horizontally on each Top Note piece and heat.
Other tips for this purse include: Cutting 1" off of two of the Top Notes; Cutting the top side flaps off the Box #2 diecut; and using Sticky Strip to hold the Top Notes to either side of the box.
Tuesday, October 27, 2009
Autumn Splendor...
I stamped the leaves from Autumn Splendor (Holiday Mini) in Really Rust and Soft Suede inks on Autumn Meadows paper, then used an aqua painter to make the colors deeper and richer looking.
The Soft Suede layer uses the Faux Suede Technique. Basically you run the card stock between your thumb and bone folder till the fibers separate. When you pull the layers apart, they feel like suede!
Other items used: 1-3/8" Circle Punch, Soft Suede polka-dotted ribbon, Vintage brads, dimensionals, sponge dauber, and linen thread.
This card was CASE'd from here.
Grateful Greetings and Inspired by Nature...
The idea was CASE'd from here.
The grass image is from the Inspired by Nature stamp set, and the sentiment is from the Grateful Greetings set featured in the Holiday Mini Catalog.
Other items used include the Ticket Corner Punch, sponge dauber and Earth Elements brads.
Monday, October 26, 2009
New Deal of the Week!
Regularly $15.95 each, these party kits are only $9.99 this week.
Remember my special on top of this - no shipping or sales tax is charged if you pick up the item from my home or studio!
Email me to place your order. I have orders going in all the time!
Gifts of the Earth meets Holiday Best...
The Very Vanilla card uses the turkey from Gifts of the Earth, and the "Give Thanks" stamp from the Level 1 hostess set Holiday Best.
We used watercolor crayons and a blender pen to color the turkey, and used markers to ink up the sentiment stamp before punching it out with the Wide Oval Punch.
That fabulous paper - top and bottom - is from the Autumn Meadows designer pack in the Holiday Mini Catalog, with a piece of Really Rust card stock punched with the Eyelet Border Punch in between. The ribbon is 5/8" Chocolate Chip grosgrain.
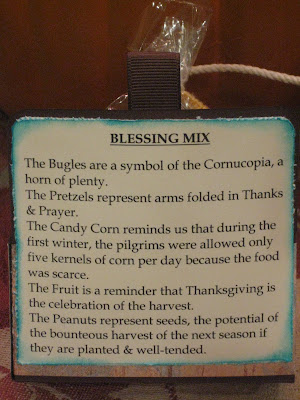
A box of blessings...
We made this as one of my Autumn Thanks Stamp Camp projects Sunday, and had a great time! Thank you all for attending.
I used the Box #2 die for the Big Shot (cutting off the small side flaps), as well as Autumn Traditions designer paper for the container (rounding the upper corners of the dsp to match that of the box).
Other items used include 5/8" Chocolate Chip grosgrain ribbon, the Leaves die, Playground buttons, Curly Label Punch and medium cello bags.
I got the Blessings Mix verse from Angie Juda's blog. I typeset it and printed it on Very Vanilla card stock.
I hope your Autumn and Thanksgiving are blessed.
Sunday, October 25, 2009
Falling Leaves pumpkin bag...
All of the ovals are sponged with Pumpkin Pie. The leaf is from the Leaves die for the Big Shot, and the Thanksgiving saying comes from the Falling Leaves stamp set.
Gold cord holds the tag in place.
Wandering Words with bling...
Saturday, October 24, 2009
Halloween Stamp Camp with Twick or Tweet stamps...
All of the projects use the Twick or Tweet stamp set, as well as Night and Day or Cast-a-Spell designer series paper.
Several items used dies for the Big Shot. If you don't have one yet, I can help you with that!
Have a wonderful Saturday. My kids are excited about dressing up for their school's Fall Festival tonight.
Twick or Tweet box and Spooky Rub-ons...
One of the things I love about being a Stampin' Up! demonstrator is that I don't have to do that alone. There's inspiration everywhere!
This project is straight out of the Holiday Mini Catalog. It uses the Box #2 die for the Big Shot, with a piece of Night and Day paper inside, the top scalloped with the Scallop Edge Punch.
The black swirls to either side of the ovals are from the Spooky Treat Rub-Ons. They are so great for everything, and I especially love that there are six of each image in black and another six in white in every package.
The black oval was cut from the Lots of Tags Sizzlet die for the Big Shot, and placed under a Wide Oval Punch in Whisper White that only had the saying from this Twick or Tweet stamp set on it.
The skeleton and dog image was stamped on another piece of Whisper White, cut out and adhered to the white oval.
Spotlighting with a Punch Technique with Twick or Tweet...
Here's how it's done: Stamp your image twice. I stamped the skeleton and dog stamp from the Twick or Tweet stamp set once on Whisper White card stock, then a second time on Old Olive card stock. I punched the Old Olive image with a circle punch and then adhered it over the black and white version. That's it!
I wish I could take credit for this card, but I CASE'd it. I love how the Scallop Circle Punch was used on the upper right corner to show a "bite." I also adore the Cast-a-Spell designer paper used on the left. I layered that on Old Olive card stock and tied a knot of 5/8" black grosgrain around it.
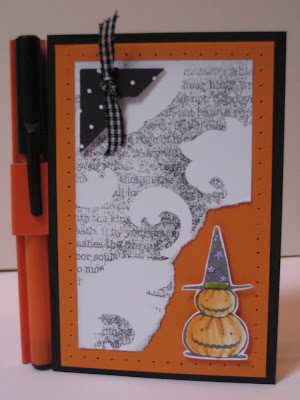
Twick or Tweet pumpkins...
We just covered the front of the book with Basic Black and Pumpkin Pie card stock (pierced all the way around). Then layered some Night and Day paper on top of that, ripping the bottom corner to draw more attention to the stacked pumpkins with the witch hat from the Twick or Tweet stamp set. That image is adhered with dimensionals.
To finish, we punched a Photo Corner Punch from a scrap of Night and Day paper, tied a knot of black gingham around it and adhered that with dimensionals.
Twick or Tweet and Haunting Hill jumbo wheel...
Friday, October 23, 2009
Reverse Sponging Technique with Lovely as a Tree...
This month's class included this Reverse Sponged card, along with the Split-Image Technique and Pillow Box Bucket shown below.
What I love (and my customers loved) about this card is that it's a single layer that doesn't scrimp on design.
With a package of Very Vanilla card stock, a couple rolls of Sleigh Bells ribbon (in the Holiday Mini Catalog), a few ink pads (Close to Cocoa, Basic Brown and Real Red), and two stamp sets (Lovely as a Tree, Christmas Greetings), you can easily make 80 cards in no time flat.
We used the frame from the Oval Scallop die for the Big Shot to sponge inside a Very Vanilla card with Close to Cocoa ink. Then we stamped the big tree from the Lovely as a Tree stamp set without reinking the image. We removed the oval frame and stamped the big tree in its entirety in Basic Brown ink.
Using the "Merry Christmas" from Christmas Greetings, we stamped the greeting in Real Red, with the verse inside, also in Real Red ink.
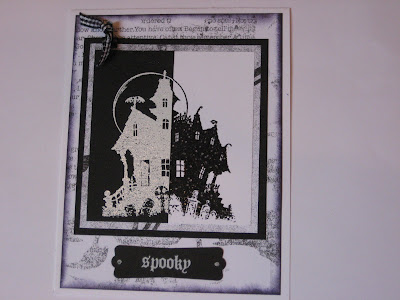
House of Haunts Split-Image Technique...
In addition to the bucket below (our 3d technique), we made this cool card using the House of Haunts stamp set, Spooky Treats Rub-Ons, and Night and Day designer paper.
The Split-Image Technique is simple: I cut two squares of card stock (Whisper White and Basic Black) the same size as the house stamp's wood block. I stamped the house image in Versamark on each piece, and heat embossed the image on black card stock with White Embossing Powder, and the image on white card stock with Black Embossing Powder.
Once you have those embossed pieces, simply cut them in half and piece half of each together, so you can make two split-image cards.
The "spooky" is a white rub-on on a piece of Basic Black card stock that's been punched using the Modern Label Punch. I used the Uni-bal white gel pen to add the white spots.
There's a little black library clip (in a class I use these to keep the rub-on and its layer together) with a knot of black gingham ribbon.
Spooky Treats Rub-On bucket...
I had to make one! It uses 3 Pillow Box diecuts (Pumpkin Pie card stock here), and you remove all of the curved pieces that are scored. I then used the Cutter Kit to distress the tops and bottoms a bit.
We used 3 strips of Basic Black card stock inside that were scored 1/2" from each end, adhered with Sticky Strip for strength, then adhered a Pumpkin Pie circle to the strips - again with Sticky Strip.
This bucket uses 2 pieces of Cast-a-Spell designer paper (3" x 12" and 3" x 3 1/4"), along with a Pumpkin Pie Scallop Circle (attached with dimensionals).
I used the white rub-on on Basic Black card stock, then punched it out with the Wide Oval Punch.
The finishing touch is a knot of the 1-1/4" striped Pumpkin Pie ribbon, attached with a dimensional, as well as some shredded card stock and candy!
Wednesday, October 21, 2009
Lexicon of Leaves...
The main stamped image is from the Lexicon of Leaves stamp set. It's sponged around and layered on Chocolate Chip card stock. Then those layers are adhered to a piece of Autumn Meadows dsp and a Chocolate Chip card body.
Sherry makes cards every month to send to our troops. If you'd like to donate cards and envelopes, let me know and I'll put you in contact with her. She does great work!
Wandering Words thankful card...
The acorn stamp is from The More, The Merrier hostess set.
Sherry provided this make & take for all of us at a recent demonstrator gathering at her house. She does a fabulous job of hosting our meetings every other month - and this one was no exception. She showed us a 44-page album she'd made with My Digital Studio, as well as other terrific wall hangings, cards and other projects. I loved it all!
No matter where you live in Western Washington, you're welcome to attend my American Ink group's demo gatherings. We're meeting Nov. 14 at 11 a.m. at my Poulsbo studio, 6487 NE Silver Springs Ln. Hope you can make it!
Tuesday, October 20, 2009
Greetings, Earthling & House of Haunts...
Bea brought this adorable swap card, and it was a hit!
The alien is from Greetings, Earthling, the sentiment is from House of Haunts, and the robot is from Lots of Bots (gotta love those wiggly eyes!).
Everything was stamped in Basic Black on Very Vanilla, then layered on black and Certainly Celery card stocks, before being adhered to a Dusty Durango card with a knot of the same color polka-dotted ribbon around it.
Autumn Splendor & Sincere Salutations...
Bea brought this make & take for us to stamp recently. I changed it a little. She had nuts below the saying and the cut-out leaf popped up with dimensionals on the upper left corner of the top two layers. Sometimes I have a hard time copying stuff as presented to me.
Anyway, Bea stamped the leaf I cut out in More Mustard on Glossy White card stock. Then we tied a golden bow around the stem. The sentiment is from the versatile word set Sincere Salutations.
The other colors on the card are Old Olive and Basic Brown. Simple and pretty!
Falling Leaves...
Monday, October 19, 2009
Deal of the Week: Circle brads, grommets and clips
They are: Basic Jumbo Grommets (#114348, reg. price $6.95, special price $4.49);
Mini Library Clips (#109857, reg. price $12.95, special price $8.99);
Circle Designer Brads (#112571, reg. price $5.95, special price $3.99);
and 1/2" Library Clips (#112581, reg. price $6.95, special price $3.99).
All you have to do is email me at ericandterry@comcast.net. You pay the special price - no shipping or tax! I have orders going in all the time. There's no limit to the amount you can purchase - so think Stocking Stuffers for your favorite papercrafter!
Grateful Greetings & Thoughts & Prayers...
Cheryl signed up with Sherry recently, and brought this beautiful card to swap. In addition to the Grateful Greetings stamp set (found in the Holiday Mini), and Thoughts & Prayers stamps, it uses a square punch, sponging, crimping (behind the squares), cut-out butterflies adhered with dimensionals, designer paper and glitter.
If you'd like to attend our demonstrator gatherings, just contact me at ericandterry@comcast.net. You can see first-hand all of the fun we have, and the great stamping projects we make and share.
Also, right now you can purchase a Starter Kit for only $185 AND have it include My Digital Studio. That's a bonus!
Autumn Days & Thanks Embosslit Die...
Pearl is one of my downline. She had us use markers to ink up the Autumn Days stamps, and had pre-diecut the Thanks Embosslit for her make & take at a recent demo gathering.
The card body is Pumpkin Pie, with a smaller Always Artichoke layer. We used a Versamark pad to stamp some leaves in the bottom right-hand corner behind the pheasant.
Sunday, October 18, 2009
Wandering Words & Autumn Harvest...
Saturday, October 17, 2009
Wandering Words...
This More Mustard card was my swap at our recent demo gathering. The saying was stamped on the card with Basic Brown ink.
I used a piece of Autumn Meadows designer paper from the Holiday Mini Catalog to bring beautiful fall colors into the card.
I finished it with a 5/8" strip of Chocolate Chip grosgrain, and a Playground button with some linen thread.
Gobble, Gobble & Falling Leaves...
The card body is Dusty Durango, with an Old Olive layer behind the Very Vanilla one stamped with the leaves in More Mustard, Dusty Durango and Old Olive.
We used markers of the same colors to ink the rubber of the turkey stamp, punching it out with the Scallop Circle Punch, then layering it on a 2" Soft Suede circle, which Kim cut with the Circles die for the Big Shot.
The brown circle is adhered with dimensionals.
Saturday, October 3, 2009
House of Haunts & Scary Skeleton...
The top layer is glossy white card stock, layered on Basic Black, Pumpkin Pie and then Lovely Lilac.
Kim used the Ticket Corner Punch on the glossy and black layers. She stamped the bat from Scary Skeleton on the card front, along with the greeting.
Friday, October 2, 2009
Batty for You mini album
If you don't own the Batty for You stamp set, you should! It is so easy to use with our circle punches,and the Scallop Circle Punch.
Like a couple other Halloween Stamp Camp projects, this one uses Cast A Spell designer paper.
Other accessories include the Eyelet Border Punch and the wide, striped Old Olive ribbon, which was knotted and added to the front with mini glue dots.