Thursday, December 31, 2009
Jolliest Time of the Year...
It's a Bashful Blue card with some Bashful Blue patterned paper at the top and white satin ribbon across the middle.
The sentiment is from the Short & Sweet set, and the snowman is from the Jolliest Time of the Year.
Markers were used to color in the image, then the final touch was 2-way glue and Dazzling Diamonds glitter.
Happy New Year!
Wednesday, December 30, 2009
Cold & Cuddly...
This is a 6" square of Crushed Curry card stock, with a strip of Night of Navy patterned paper from the Level 1 hostess paper pack.
I used markers to ink up the penguin on the rubber, and punched it with the 1-3/8" Circle Punch after stamping it on Whisper White card stock. It was then layered on a Real Red Scallop Circle Punch, which is adhered with dimensionals on top of the card and 1/4" Real Red grosgrain.
Tuesday, December 29, 2009
Sweet Season...
The stamp set is called Sweet Season. I stamped the snowflake and verse in Tempting Turquoise and used the Scallop Circle and 1-3/4" Circle punches for the snowflake, adding a Tempting Turqoise brad from the Bold Brights package.
The card is Very Vanilla. The patterned paper is from the Holiday Lounge pack, adhered over a strip of Sahara Sand that's been punched using the Eyelet Border.
A knot of Kraft taffeta finishes the card.
Monday, December 28, 2009
Best Wishes & More thank you...
This is a Whisper White card stamped with Soft Suede snowflakes from the Best Wishes & More stamp set. The sentiment is from that set too. The ornament is from the Delightful Decorations stamp set in the Holiday Mini, which is only available to order for a few more days (you can order online here or email me with your order).
I used a strip of Christmas Cocoa paper, layered on Soft Suede with a knot of Soft Suede polka-dot ribbon around it.
I'll actually be starting 2010 with birthday cards for my family and friends born in the winter! It's a first....
Sunday, December 27, 2009
Simple Seasonal Thanks...
The sentiment on this card is from the Christmas Punch hostess set (Level 2). I used Brocade Blue and Real Red markers to ink up the rubber, then the Curly Label Punch. It's adhered to the Brocade Blue card with dimensionals.
Saturday, December 26, 2009
Frankie's delicate paper ornaments...
Sorry about the lame photo! These are striking in person.
Friday, December 25, 2009
Bea's milk carton gift...
Bea used the Holiday Lineup and Sincere Salutations stamp sets, numerous punches (Scallop Circle, Wide Oval, Oval Scallop, etc.) and wide striped Old Olive ribbon.
This idea was CASE'd from blogger Becky Roberts.
Wednesday, December 23, 2009
Sherry's holiday wall hanging...
It uses the Big Shot Scallop Square and Join in the Cheer dies, flower brad and double-stitched Rose Red ribbon.
Tuesday, December 22, 2009
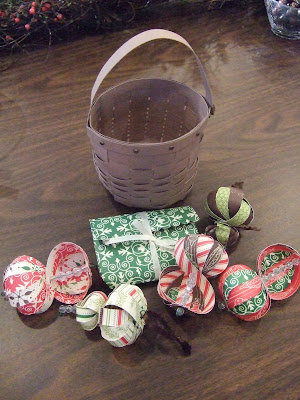
Heather's basket & paper ornaments...
She brought this to our Christmas gift exchange. Very impressive!
Monday, December 21, 2009
Michelle's snow glass block...
Sunday, December 20, 2009
Finial Press Party Favor Candy Box...
I ran a 6" x 12" piece of thick window sheet (available in the big catalog) through the Big Shot with the Party Favor Box die, peeled the blue covering off of each side, and then ran the box through the Big Shot again a few times inside the Finial Press textured embossing folder.
The box is held together with Sticky Strip, then I adhered a 1" piece of Holiday Lounge paper around it, along with a knot of White Organza ribbon. The tag is from the Level 2 hostess set, Christmas Punch.
This project was CASE'd from here.
Saturday, December 19, 2009
Simple Seasonal Thanks votive holder...
I always have people who pop by the house, unexpected, with some treat or small gift for myself or our family. I don't like to be caught unaware, so I like to have small gifts on hand with which I can reciprocate.
I stamped the Simple Seasonal Thanks stamp (just one big snowman with words inside of him) in Basic Black ink on Whisper White card stock, then used Real Red, Only Orange and Bashful Blue markers to color it. I used a 2-way glue pen to add Dazzling Diamonds glitter all over the image.
The Close to Cocoa box is the Bitty Box die for the Big Shot, with a 1-3/4" Circle Punch just through the top. No adhesive is needed for the box, which is very cool. The votive just sits in it.
I CASE'd this idea from Connie Babbert.
Sparkly & Bright waterfall card...
I used the Sparkly & Bright stamp set, stamping the images in Ruby Red, Taken with Teal and Sahara Sand on Whisper White card stock. Those layered squares are adhered onto a scored strip of Taken with Teal.
The card is a 10-1/2" x 5" piece of Sahara Sand on a 4-1/4" x 5-1/2" piece of Taken with Teal.
The strip of Holiday Lounge designer paper is layered on a same-sized strip of Taken with Teal for strength. The brads hold the strips in place so when you pull the long strip at the ribbon knot, the squares flip up to expose each stamped image.
Thursday, December 17, 2009
Vintage Ornaments stenciled tile...
First, we sponged on the Brilliant Blue and Lovely Lilac ornaments using the stencils and craft ink squirted onto a paper plate.
Then, without heating or anything, we laid the flourish stencils over the centers and sponged on silver ink from a refill bottle.
These tiles were baked in the oven at 325 degrees, but the ink bubbled, so I'd suggest a lower temperature for about 10 minutes.
After that, we added a knot of double-stitched Bashful Blue ribbon and a tag with a saying from the Grateful Greetings stamp set (Holiday Mini), tied on with silver cord. The tile sits on a clear plastic easel for a nice display.
Night & Day Keepsake Box...
Kim made this using a dollar craft box and Night & Day paper (Holiday Mini 2009). It's very elegant looking with the 5/8" Black grosgrain foofed into a pretty bow. And look at the white gift bag she decorated to accompany it!
You could keep all kinds of memorabilia in here, including photos, jewelry, scarves and many other items in here.
Kim even used clear rhinestones to make the cover hinge in back. I'm sorry I didn't get a photo of that.
This was another handcrafted gift item exchanged at our American Ink party. These gifts mostly take some time and effort. They're not expensive.
Wednesday, December 16, 2009
Vintage ornament decor elements frame...
It uses an inexpensive frame, Christmas Cocoa designer series paper, and Real Red Vintage Ornaments decor elements. Several lines come with the ornaments, so you can "drop" them from the top of a sliding glass door, or make them different lengths, like I did here.
To add more dimension, I adhered half pearls from the Pretties Kit with Mini Glue Dots, along with bows of ribbon.
Monday, December 14, 2009
Winter Post tin of cards...
I used the Winter Post stamp set in Tempting Turquoise, along with the Snowflake Punch with a jumbo Chocolate Chip brad through it. I used the Scallop Edge Punch at the bottom and a strip of White Organza ribbon.
A 1-1/4" double-stitched Chocolate Chip ribbon
Christmas Jingle metal star...
You can see that each point of the star has four different patterns of designer paper on it, as well as embellishments ranging from buttons to self-adhesive diecuts from the Christmas Jingle Simply Scrappin' Kit.
I hope you're enjoying our 12 Days of Christmas gift ideas.
Sunday, December 13, 2009
Pearl's SNOW blocks...
Our American Ink group has an annual Christmas party where we select gifts White Elephant style.
The decor elements and blocks needed to make this fun display are offered in the Holiday Mini Catalog till Jan. 4, 2010.
Decor elements vinyl is on sale now through Dec. 22, so you can make your own letters with a Big Shot alphabet (there's one on sale now also) and colored vinyl of your choice! Email me at ericandterry@comcast.net if you'd like to place an order. I've got orders going in all the time.
And though there are 13 days 'til Christmas, we're going to share our 12 Days of Christmas starting today... and we'll end with a bang on the 13th.
Friday, December 11, 2009
Save 15-25% on Big Shot dies and materials....
You can either order online here, or email me at ericandterry@comcast.net.
Item 114515, Page 195, Flower Burst Embosslits die, $8.96 (reg. $11.95)
Item 114516, Page 195, Cherry Blossom Embosslits die, $8.96 (reg. $11.95)
Item 115957, Page 195, Thanks Embosslits die, $8.96 (reg. $11.95)
Item 114513, Page 195, Sweetest Stem Embosslits die, $8.96 (reg. $11.95)
Item 115952, Page 195, Hi Embosslits die, $8.96 (reg. $11.95)
Item 115951, Page 197, Timeless Type Junior Alphabet Medium Sizzlits die, $59.96 (reg. $74.95)
Item 113446, Page 197, Build a Flower #2 Set Sizzlits 4-Pack die, $16.96 (reg. $19.95)
Item 114509, Page 197, Big Bold Cupcakes Sizzlits 4-Pack die, $18.66 (reg. $21.95)
Item 113448, Page 197, Hearts Set Sizzlits 4-Pack die, $16.96 (reg. $19.96)
Item 113457, Page 198, Tulipe Bigz Die, $16.46 (reg. $21.95)
Item 115954, Page 198, Two Tags Bigz die, $18.66 (reg. $21.95)
Item 114524, Page 199, Fringed Flower Bigz die, $15.96 (reg. $19.95)
Item 114523, Page 199, Decorative Accents Bigz die, $15.96 (reg. $19.95)
Item 114534, Page 199, Flower Bigz Clear die, $15.96 (reg. $19.95)
Item 113473, Page 199, 5-Point 3D Star Bigz die, $16.96 (reg. $19.95)
Item 113472, Page 199, Circle 3D Ornament Bigz die, $16.96 (reg. $19.95)
Item 113470, Page 199, Flower Layers w/Leaf Bigz die, $16.96 (reg. $19.95)
Item 113465, Page 199, Bird w/Leaves and Flower Bigz die, $16.96 (reg. $19.95)
Item 115961, Page 200, Perfect Setting Bigz XL die, $32.21 (reg. $42.95)
Item 113483, Page 200, Pennant Bigz XL die, $29.96 (reg. $39.95)
Item 113484, Page 200, Baskets & Blooms Bigz XL die, $31.96 (reg. $39.95)
Item 116760, Page 201, Pop-Up Three Tier Cake Bigz XL die, $29.96 (reg. $39.95)
Item 116759, Page 201, Pop-Up 3D Ball Bigz XL die, $29.96 (reg. $39.95)
Item 114890, Page 201, Matchbox Bigz XL die, $36.51 (reg. $42.95)
Item 113458, Page 202, Flower Layers Originals die, $13.56 (reg. $15.95)
DECOR ELEMENTS SHEETS
Page 158, Kraft, Dark Gray, Chocolate, or White sheets 12" x 24" (2), $10.36 (reg. $12.95)
Item 118797, So Saffron 15" x 24" (2), $9.71 (reg. $12.95)
Item 118798, Rose Red 15" x 24" (2), $9.71 (reg. $12.95)
Item 118799, Taken With Teal 15" x 24" (2), $9.71 (reg. $12.95)
Item 118800, Pretty In Pink 15" x 24" (2), $9.71 (reg. $12.95)
Item 118801, Bashful Blue 15" x 24" (2), $9.71 (reg. $12.95)
Item 118802, Real Red 15" x 24" (2), $9.71 (reg. $12.95)
Item 118803, Old Olive 15" x 24" (2), $9.71 (reg. $12.95)
Item 118804, Black 15" x 24" (2), $9.71 (reg. $12.95)
Item 118805, Night of Navy 15" x 24" (2), $9.71 (reg. $12.95)
Item 118806, Certainly Celery 15" x 24" (2), $9.71 (reg. $12.95)
Item 118807, Tempting Turquoise 15" x 24" (2), $9.71 (reg. $12.95)
Item 118808, Clear 15" x 24" (2), $9.71 (reg. $12.95)
Item 118809, Pumpkin Pie 15" x 24", $9.71 (reg. $12.95)
Item 118810, Pixie Pink 15" x 24", $9.71 (reg. $12.95)
Item 118812, Sahara Sand 15" x 24", $9.71 (reg. $12.95)
Item 118813, Gable Green 15" x 24", $9.71 (reg. $12.95)
Item 118814, Basic Gray 15" x 24", $9.71 (reg. $12.95)
Item 118815, Chalkboard 15" x 24", $11.21 (reg. $14.95)
Thursday, December 10, 2009
Pearl's Grateful Greetings card...
We used the Grateful Greetings stamp set in the Holiday Mini, as well as Snow Buddies (Level 2 hostess in the same mini). You can only buy/earn these stamps till Jan. 4, so let me know if you're interested!
We cut a triangle for the tree, then used the Scallop Edge Punch for the bottom. We stamped a snowflake all over it and folded at 1/2", 1/4", 1/2", 1/4", etc. Mini glue dots hold down the folds.
Of course the tree had to be topped off with a punched Summer Sun star from the small star punch, and we added a brad for bling.
Have a wonderful day!
Wednesday, December 9, 2009
Bea's Holy Triptych...
The Bashful Blue card uses layers of blue with Whisper White, including White Organza ribbon.
We colored in the angel and added Dazzling Diamonds glitter with a 2-way glue pen.
Monday, December 7, 2009
Branch Out...
It uses a 5-1/2" strip of White Organza ribbon under a Whisper White Top Note (cut with the Big Shot) that's been stamped with Branch Out and All Holidays.
The only ink pad colors are Real Red and Brocade Blue. Once I stamped the three images, I used a 2-way glue pen and Dazzling Diamonds glitter to glitz up the tree.
A card I saw here inspired my version.
Branch Out will be retiring in early January 2010, so if you like the stamp set (also has a tire swing, bird house, boots and "fluff" stamp that can be used for leaves or snow) email me and I'll order it for you!
My Digital Studio downloads...
118114 Cast A Spell Designer Series paper - digital download
118115 Night & Day Designer Series paper - digital download
118124 Medallion stamp brush set - digital download
118126 Circle Circus stamp brush set - digital download
118116 School Days II stamp brush set - digital download
118121 Great Moments II stamp brush set - digital download
118122 Pumpkin Patch stamp brush set - digital download
Just visit http://TheRubberRoom.stampinup.net and click on "SHOP NOW." You can also add other items to your order. Follow the directions to download your digital downloads to your computer.
Sunday, December 6, 2009
Baroque Motifs & Holiday Best card....
This is a Whisper White card with a 5-1/4" x 4" piece of Brushed Gold card stock that's been embossed with VersaMark ink and Gold Glory embossing powder using the largest stamp from the Baroque Motifs set.
I knotted white satin ribbon and attached a Whisper White snowflake (made with that die and the Big Shot machine) with dimensionals. The Holiday Best stamped image was also embossed, punched out with the 1-3/8" Circle Punch and layered on a gold scallop circle with each scallop pierced.
I CASE'd this card from Jan Tink. You can find her more elaborate version here.
Thursday, December 3, 2009
One month only to order items on Dormant List!
STAMPS:
Item # Stamp Set Page # in current big catalog
113407 Backwoods 102
114492 Beautiful Baby 208
114486 Birthday Wish 208
113200 Branch Out 100
114496 Celebrations 208
113732 Central Park 106
113206 Classic Sketches 119
113226 Classy & Fabulous 51
113750 Easter Beauty 29
114498 Flowers in Silhouette 208
113405 Font of You 46
113216 For the Bride 61
114494 Forever 208
109425 Friend by Definition 135
114488 Fun Flowers 208
113716 Garden Greetings 55
114490 Glad Friends 208
111580 Grand Soiree 126
113242 Hit the Road 103
113710 Lexicon of Leaves 101
113236 Man's Best Friend 72
114423 Ocean Commotion 97
113728 Playful Petals 99
109276 Polka Dot 135
111544 Putt Putt 81
113240 Quilt Quips 53
113754 Really Retro 132
113403 Sip by Sip 51
113726 Sweet Stems 99
113250 That's Funny 63
113688 Wonderful Watercolors 85
Wednesday, December 2, 2009
Delightful Decorations and Christmas Jingle...
Kim stamped a couple of the ornaments from Delightful Decorations (Holiday Mini) directly on the card front, then added gold cord and 1/4" Real Red grosgrain for a 3d look.
The third ornament has been cut out and popped up with dimensionals, with a knot of ribbon added to the top of that.
The sentiment is from Teeny Tiny Wishes, a stamp set that has words for every occasion.
Tuesday, December 1, 2009
Dasher gift card holder...
Kim came up with this gift card holder. It has Dasher stamped in Soft Suede with the Merriment stamp in Real Red on Whisper White card stock. That is layered on some red Christmas Cocoa designer paper, which is layered on another pattern from that same pack.
The entire holder is 4-1/2" x 11", scored at 3" from either side, then at 5-1/2". The two middle panels are adhered just around the very edges of the sides and bottom. Then you use the Word Window punch twice to make a slot wide enough for a gift card, then a circle punch for a finger pull.
Kim adhered more Christmas Cocoa on an inside panel and the back. The ribbon is only under the top layers.
Monday, November 30, 2009
Embossed Petals-a-Plenty Christmas Wishes...
Kim cut an oval through the folder. She put the 4" x 10-1/2" Whisper White card stock inside and the entire card was embossed with the flowers.
Then she inked up the dove stamp with Elegant Eggplant, Old Olive and Brocade Blue markers and stamped it in the middle of the oval.
After adding the Mistletoe Ribbon Originals, Kim layered the white card on a 4-1/4" x 5-1/2" piece of Elegant Eggplant.
Sunday, November 29, 2009
Holly's Snow Buddies snowglobe card...
Holly got the idea off the back of the Holiday Mini Catalog, but all of the hard work is hers. The globe is Bashful Blue, with snowflakes and swirls from Snow Buddies (Level 2 hostess set in Holiday Mini) stamped and then glittered.
The base is Soft Suede, with a knot of Soft Suede polka-dotted ribbon. The sentiment is from the stamp set Best Wishes & More.
To check out more of Holly's great work, visit here.
Saturday, November 28, 2009
Modern Sparkly & Bright...
There's glitter on the stocking, reindeer and the letter "i" in the word "bright." The knot of Bermuda Bay polka-dotted ribbon adds to the bright cheeriness of this card.
Friday, November 27, 2009
Snow Swirled...
This was a swap at our last demonstrator gathering. We get together once a month (December is our annual Christmas party - hooray!).
Thursday, November 26, 2009
Happy Thanksgiving!
Here's my Grateful List:
- A loving and healthy family
- Terrific friends & downline
- Wonderful SU! customers
- A roof over our heads
- Working transportation
- The opportunity to help others
- Being alive and able to appreciate the little things that are so easy to overlook
I wish you and your family a blessed Thanksgiving. I hope you'll pause to say thanks for all of the blessings in your life, no matter how small. God bless you!
Now for the card details. This is a swap from one of my downline, Brandy. She's got a lot of things going on in her life with family and full-time job and such, and took the time to cut out and color the details on this Voila card. Thanks, Brandy!
Wednesday, November 25, 2009
Night & Day Herringbone Technique card...
To do the Herringbone Technique: Lay a strip at an angle across the entire sticky surface. Then lay strips on either side of that one at a 90-degree angle, which make triangles. Keep laying additional strips at 90-degree angles to the last, filling up every space. Trim off the strips and layer and create your card. It's that easy!
The FYI stamped sentiment is stamped in Basic Black ink and punched using the Word Window Punch, then layered on a Modern Label punched piece of Basic Black card stock.
I used a knot of 1/4" Basic Black grosgrain in keeping with the black and white look, then stamped and cut out the butterfly from Great Friend, adhering it with Stampin' Dimensionals.
Bea's pink Christmas Classics card...
The ornament and sentiment are both from the Christmas Classics stamp set. There's lots of Dazzling Diamonds glitter on the ornament.
My favorite thing about this card is the use of non-traditional Christmas colors. Love it!
Tuesday, November 24, 2009
Pearl's Delightful Decorations card...
It's a Sahara Sand card with snowflakes in the same color ink, a strip of Holiday Lounge designer paper down the middle, and three punched ornaments from the Delightful Decorations stamp set in the Holiday Mini Catalog. She added Chocolate Chip strips of card stock from which the ornaments hang.
Only one month 'til Christmas is here!
Monday, November 23, 2009
Dasher...
I like monotone cards. They're clean and simple.
There's a knot of 5/8" Real Red grosgrain just around the flocked layer, with a Whisper White Top Note on top that's been stamped with Dasher and Merriment stamps (merry & bright) in Real Red.
To add the final touch of glitz, I used my 2-way glue pen with Dazzling Diamonds glitter on Dasher's antlers.
Sunday, November 22, 2009
Cheryl's Petals-a-Plenty Christmas card...
This swap reminded me of a few things - adding glitter to our fabulous designer paper really makes a difference, edge punches can be used at an angle, and a little bit of texture is nice - it doesn't have to be the whole card.
Cheryl used several different designs from the Merry Moments designer series paper pack. The only stamping is the "thank you" that was punched out and layered.
The Petals-a-Plenty textured embossing folder for the Big Shot was used on the white corner of the card, as well as the oval scallop punched behind the greeting, and the strip at the top corner.
Even with those things going on, what really stands out when you hold the card is the glitter on the ornaments. You feel it, see it and it's amazing! So try something different on your own cards.
Saturday, November 21, 2009
New images available for My Digital Studio...
Item 118117 - Berry Christmas stamp brush set - $5.95
Item 118118 - Friend by Definition stamp brush set - $1.95
Item 118119 - Just Perfect Alphabet stamp brush set - $9.95
Item 120880 - Christmas Cocoa II digital kit - $9.95
Item 120881 - Write Stuff II digital kit - $9.95
Item 120882 - Icicle digital photo card kit - $3.95
Item 120883 - Merry Moments digital photo card kit - $3.95
If you'd like to order any or all of these downloads, please email me OR you can just visit my online store here: http://therubberroom.stampinup.net/ and click on SHOP NOW.
Michelle's Serene Snowflakes & Holiday Best...
Michelle W. brought this as a make & take to our recent demonstrator gathering. We used the paper trimmer with scoring blade to score a few lines at the bottom of the Very Vanilla card.
The Serene Snowflakes were stamped in Chocolate Chip, Not Quite Navy and Champagne Mist Shimmer Paint, then layered on Chocolate Chip before being adhered to the card.
The sentiment is from the Level 1 hostess set, Holiday Best. We used the Wide Oval Punch to punch it out, then sponged around it in blue and added it to the card with dimensionals. It's also covered with shimmer paint for a dazzling sparkle.
Friday, November 20, 2009
Delightful Decorations & Elegant Bouquet...
The card is Whisper White with a 4-1/4" x 5-1/2" piece of Real Red card stock behind it.
Then one of the ornaments from Delightful Decorations (Holiday Mini) is stamped in Real Red, with a "middle" stamped and punched and layered with a brad in the center.
The knot of 3/4" Real Red Polka-Dotted Ribbon is just around the front white flap.
The greeting is from the Christmas Greetings stamp set.
Ornament punch Four the Holidays...
I put adhesive on the back of one punched ornament after adding a bit of silver cord. Then with the second punched ornament, I folded it in half and attached it to the middle of the first with a few mini glue dots. The half pearl from the Pretties Kit was also adhered with a mini glue dot.
The "Merry Christmas" is from the Four the Holidays stamp set and it's stamped in Always Artichoke ink.
I CASE'd this idea from here.
Thursday, November 19, 2009
Winter Post filmstrip technique card...
I stamped the images in Close to Cocoa, Brocade Blue and Old Olive, then punched them out with the 1-3/8" square punch and layered them on a Chocolate Chip strip 2-1/4" wide that had been punched on each side with the Spiral Punch.
There's a Brocade Blue layer under the "filmstrip" on the Very Vanilla card, and a knot of Chocolate Chip taffeta at the fold.
For the greeting, I inked the stamp in Brocade Blue then used a blender pen to remove the blue ink from "Dec. 25" and inked it with an Old Olive marker. I punched it with the Designer Label Punch and adhered it with dimensionals.
Wednesday, November 18, 2009
Vintage Ornament stencil and Shimmer Paint...
I started with a Very Vanilla card and some foliage from Le Jardin Botanique stamped in Handsome Hunter.
I used a sponge dauber in Night of Navy ink and stencil for the ornament, then used the flourish stencil (in the same packet) for the inside of the ornament in Champagne Mist Shimmer Paint.
The sentiment is from Four the Holidays (Holiday Mini). I rounded the corners on the right side, sponged around it with Night of Navy ink, and adhered it with dimensionals. A navy button was added with a mini glue dot.
The bottom photo shows the shimmer paint a little better.