My Stampin' Up! Classes

Tuesday, November 30, 2010

Cookie cutter Christmas for WOYWW...


It's been a couple of weeks since I've participated in What's on Your Workdesk Wednesday (WOYWW), so I thought I'd get back in the swing of things since I've always got stuff on my desk lately!

I saw Christmas cookie cutters used as a wall decoration on page 174 of the Stampin' Up! 2010-2011 Idea Book & Catalog and thought to myself, "Self, that might be fun to make." Well, the shopping for the cookie cutters was fun. I got those half-priced. It was easy to adhere to cutters to Jolly Holiday dsp. The tough part is how gooey the adhesive is (I used Tombow Liquid Adhesive). Go figure! I thought it would dry completely since I did that step days ago. Nope. Still gooey. I used a pair of cheap scissors to cut the paper around the cutters and a hobby blade for the tighter spots. I used my Crop-a-dile to easily punch a 3/16" hole in the top of each cutter, and started adding the ribbon, feeding both ends through the top of each cutter and knotting them together. I pulled the ribbon colors from the paper - Cherry Cobbler seam binding, Old Olive satin ribbon, and Very Vanilla taffeta. I've got two of the cookie cutters finished and hanging from a wooden dowel in the first photo. The dowel will be on a wall, so the cutters won't have room to spin around.

Now you can go snoop at the others' desks, including WOYWW founder - Julia - at http://stamping-ground.blogspot.com/. Have fun! And leave lots of nice comments. Everyone loves those.

Christmas Collage in Rich Razzleberry...


This is the fourth card from my most recent Christmas Card Stamp-a-Stack and it's all about Rich Razzleberry and one stamp - Christmas Collage. This is one half-sheet of Whisper White card stock. After stamping the entire stamp on the front, we used the 1-3/4" circle punch to punch out the "25," sponge around it and adhered it through the hole we made with Stampin' Dimensionals.

I took photos showing the card closed, then open, and what it looks like inside. The "Seasons Greetings" is from the Curly Cute stamp set. One advantage of clear stamps is that I cut apart the words (they come with the words side by side instead of on top of each other), positioned them on a clear block and stamped them. That greeting was punched out with the Decorative Label punch and adhered with dimensionals. To finish the card, we knotted a piece of 5/8" Rich Razzleberry satin ribbon.
It's the last day of November, which means it's the last day to:
  • Buy the Starter Kit (normally $175 + tax) for only $87.50 + tax. You have till 10 p.m. tonight to purchase the kit for this price through my website - http://therubberroom.stampinup.net/. My recruiter password: Terry Blais
  • Take advantage of 20%-50% select products through Stampin' Up!'s Online Spectacular. Visit http://www.stampinup.com/ to see what's on sale, then select me as your demo to receive the Preferred Price.

Tags 'til Christmas card with Jolly Holiday dsp...

If you still need a load of Christmas cards, look for an easy design like this one with the Tags 'til Christmas stamp set. I used the tag-shaped Santa stamp, layered on the largest one, along with a strip of Jolly Holiday dsp layered on Very Vanilla card stock. This was one of my recent stamp-a-stack cards. I added pearls for bling.

Monday, November 29, 2010

Got Treats gingerbread Christmas card...

 
I think this card is so cute! I was inspired by one of my downline's cards. For my last stamp-a-stack, I had my customers run the front of the white card through the Perfect Polka Dots embossing folder before adding the Teeny, Tiny Wishes greeting (punched with the Word Window punch) with dimensionals. We stamped the gingerbread man in Early Espresso ink, punched him out with the 1-1/4" square punch and layered him on 1-3/8" square punches. We stamped an extra gingerbread bread, cut him out and put him on with dimensionals and a few sparkly rhinestones. The squares were adhered to a square piece of Blushing Bride card stock, with coordinating ribbon knotted above the sentiment.

Welcome Christmas with Candy Cane Christmas dsp...

I love the simple beauty of this Welcome Christmas card. It uses some of the Candy Cane Christmas dsp, along with Real Red and Baja Breeze card stocks. I only used one ink pad (Real Red), along with the Four The Holidays stamp set. This was one of the cards we made at my last stamp-a-stack. My last Christmas Card Stamp-a-Stack is coming up Dec. 8. Save your space now! BTW, this card was CASE'd from Jill Hilliard.

Sunday, November 28, 2010

Metal snowflake tealight with beveled mirror...


I've been keeping my eyes open for simple but elegant ideas for my team's Handmade Christmas Party, which is Dec. 11. I came across this idea here. I found 4" beveled mirrors at a craft store, as well as two pieces of aluminum that came packaged together - one thick, one thin. I could only get one snowflake out of each piece of aluminum. When using either piece of aluminum, I added two card stock shims. I used a paper piercer to poke out the little pieces.
I made six of these in all, which cost about $5 each plus a container of Stampin' Up!'s silver glass glitter. I think these would make nice gifts too.
You saw the tealights my daughter covered using liquid glue and silver glass glitter the other day. These sit on the aluminum snowflake, which sits on the mirror with the "legs" bent up slightly. I added a rhinestone on each corner of the mirror for even more bling. These will go on our tables for the party! I'm getting excited!!!

Saturday, November 27, 2010

Jingle All The Way frame with cardinal...

After a big Santa's Workshop event last year, I ended up with a few "Jingle All The Way" decor elements. So when I saw this green frame at a craft store, I picked it up; however, it had a saying on the oval that I didn't want. I placed a piece of Deck the Halls dsp over the oval and pressed it around the oval, then roughly cut it out. I adhered it over the words and sanded around the edges. I added a bead of Tombow Liquid Adhesive around the outside and added Champagne Glass Glitter. I love that stuff!

Of course I had to have a green button with some fabulous 1/8" Real Red taffeta and a punch cardinal (see here for where I originally saw how to do it, and here to see the cardinal on a card) sitting on a branch. The photo below shows the entire frame with the 1-1/4" striped Real Red grosgrain hanger.
A few days ago, we got our first snow of the year. Being the bird lover he is, my son made sure to put out bird seed. Dozens of birds came to our backyard, including a few Stellar Jays. After watching them for a bit, I figured with a simple change of card stock, I could change the cardinal to a Stellar Jay. What do you think? It's Pacific Point card stock for the bird and one wing, and a second wing out of Basic Black. I sponged around it to add more depth.
Don't forget to create your card for the Friday Mashup! color challenge this week. The colors are: Red, black, silver and white.

Friday, November 26, 2010

Peaceful Season Technostamper challenge...

You can see from this post and the ones below that I'm taking part in a number of challenges. I love creating, but get in a rut sometimes, or am not sure where to start. A sketch or color challenge helps put me on a new track. Mary Jo has some simple sketches I adore here.

I love the Deck the Halls dsp, especially because there are coordinating designer buttons to go with it. (Check out the Online Spectacular sale this week, along with the Christmas Bundles in the right column to save money on the buttons and the paper in a bundle with a stamp set.) The greeting is from the Level 2 hostess set in the Holiday Mini Catalog called Peaceful Season.

Thursday, November 25, 2010

Lovely As a Tree card is a challenge within a challenge...


I used black, red, white and silver for a color challenge, along with the Mojo Monday sketch shown below. My daughter came up with the idea to have a silver tree.

Stamps: Lovely as a Tree;
Ink: Encore Silver pad, Basic Black pad;
Paper: Whisper White, Brushed Silver, Basic Black and Real Red;
Accessories: 5/8" Whisper White satin ribbon, Black Flourish Designer Jewels, Finial Press embossing folder, Large Oval Punch, Oval Scallop Punch, and Silver Embossing Powder.

Sweet Sunday challenge with Fireside Christmas...

I stamped this simple card for the Sweet Sunday Sketch Challenge. This is the first I've inked up Fireside Christmas. I earned this stamp set for free - just a perk of being a Stampin' Up! demonstrator (another plug - the Starter Kit, normally $175, is $87.50 thru Nov. 30, 2010).

My card is Crumb Cake card stock, with rectangles of Deck the Halls dsp, is sponged around with Always Artichoke ink and features a knot of Always Artichoke seam binding. I inked up the fireplace with Basic Brown ink, and used an Always Artichoke marker on the wreath. The Cutter Kit distressed the Clear Circle (die for the Big Shot).

A Cute Christmas sparkly snowman card...

It's good to be stamping! Tree limbs snapped off and hit power lines, knocking out power in our area from Monday around dinner time (I know because my lasagna was only half cooked) till Tuesday around 10 p.m. Wednesday was used to catch up on dishes, laundry, and returning things to "normal," including picking up turkey and some other groceries for today's big meal.

This card followed a Stamping 411 sketch (the link is already closed, so I missed that challenge). I used some Candy Cane Christmas dsp with a spiral-punched strip of Baja Breeze across the bottom with silver tinsel on it. The snowman has Dazzling Diamonds glitter on him, along with clear rhinestone buttons. For some odd reason, those little suckers photograph like silver brads! Anyway, take a peek at the sketch below.

Monday, November 22, 2010

Super Stampin' Up! Savings Start Today!

Just click on the picture to see a pdf file of items that are 20%-50% off for the next 9 days!

Also, don't forget the fabulous $87.50 offer (half price!) on the Starter Kit. It ends November 30. Sign up today and start saving! You'll get the demonstrator discount of 30% on your first order of $150+ AND you'll get free shipping with the Online Spectacular promotion. Did somebody say "Holiday Shopping?". Contact me at ericandterry@comcast.net or (360) 509-8041 and I'll get you signed up and ordering within an hour.

Turkey party picks for Thanksgiving...

There's nothing cuter than a turkey party pick in your holiday cupcake or other dish! If you have these circle and scallop punches, you're good to go! My friend and downline Cheryl made party picks like this for our American Ink team meeting just over a week ago. She made the cupcakes they were in too! Yum. I took a side view to show you how she folded the "wings." But my favorite part is the black hat, which was stuck on with a mini glue dot.


Sunday, November 21, 2010

Trendy Trees for Thanksgiving...

My friend and downline Cheryl gave me this lovely card the last time I saw her. It's simple and beautiful. It's a Very Vanilla card measuring 4" x 10-1/2" on a quarter of Soft Suede card stock. I love the sponging on the tree, along with the shiny Stickles. She added 5/8" Certainly Celery ribbon with a bit of retired Soft Suede polka-dotted ribbon. The sentiment is from the Falling Leaves stamp set.

Saturday, November 20, 2010

Pearl's perfect Bells & Boughs bling card...

My friend Pearl was a bit too late to submit this beautiful card in the last Friday Mashup! challenge, but I had to give it some blog time because it's sensational. I took a couple close-ups to show the Crystal Effects on the poinsettias, the layering, the distressing and the shimmer.

There's still time (till Dec. 16) to score 20% off Bells & Boughs and Deck the Halls dsp when you purchase them together. Click on the Christmas Bundle flyer in the righthand column to see the details. There are special prices whether you want wood-mount stamps or clear mount.

Keep an eye out Monday on my blog and http://www.stampinup.net/ for a fabulous deal you won't want to miss!

More holiday digital stuff is here!

Santa's elves have been busy designing our latest batch of digital downloads - and more are on the way for the month of November! If you would like to view our complete list of My Digital Studio download offerings, go to the customer homepage, click on Store, then Digital Crafting.

Item 123954 Holly & Jolly Embellishments $3.95
Item 123953 Jolly Holiday Designer Series Paper $4.95
Item 122181 Jolly Bingo Bits Stamp Brush Set $7.95
Item 122182 Bingo Card Stamp Brush Set $1.95
Item 123955 Christmas Countdown Stamp Brush Set $7.95

Thursday, November 18, 2010

Snowmen sound delicious


I created this card for a Snowmen theme challenge this week, and it's fun. We're looking at getting our first snow Sunday evening.

For my card, I stacked the cute little snowman from Jolly Bingo Bits and colored each of their little scarves a different color. I'm diggin' those little stamps. I'll be showing you a stamp-a-stack card we made in a couple of days. The designer paper is from the Nursery Suite pack. I followed the sketch from http://technostamper.blogspot.com/, and added a Tiny Tag. I kinda pulled the taffeta too tight and made an indentation in the card stock (oops). That sucker's not moving! I hope you enjoy your Friday.


Stamps: Jolly Bingo Bits, Tiny Tags;
Ink: Early Espresso pad, Daffodil Delight, Old Olive, Bashful Blue and Regal Rose markers;
Paper: Whisper White, Bashful Blue, Nursery Suite dsp, Regal Rose;
Accessories: Medium Jewelry Punch, paper piercer, Jumbo Brad, 5/8" Bashful Blue satin ribbon, 1/8" Early Espresso taffeta, linen thread, Northern Frost Decorative Strip for the Big Shot, dimensionals.

Beth shares some fabulous Christmas tags...

My friend and neighbor Beth has been making tons of tags and has shared these with me. They make fabulous gifts for co-workers and acquaintances - who can't use a tag? What I really love about Beth's take on some of these tags is they have movement. In the middle photo, the snowflake on the scallop is attached to the gift and the Noel tag dangles. Then in the last photo, the button gets attached to the gift and both ornaments dangle. Look at those rhinestones too! Everybody loves some bling during the holidays. It's so much fun!

Some of the items used:
  • Tags Til Christmas (Holiday Mini stamp set)
  • Gifted (Holiday Mini stamp set)
  • Delightful Decorations stamp set
  • Punches - Snowflake, Decorative Label, Ornament, 1-3/4" Circle, 2-3/8" Scallop Circle, Square Scallop, Corner Rounder, 2-Step Bird, 2-Step Owl, 1-3/8" Circle, and Scallop Circle.
  • Accessories - Silver cord, white organza ribbon, basic rhinestones, fire circle and ice square rhinestone brads, Deck the Halls buttons, basic pearls, Candy Cane Christmas dsp, Mini Glue Dots, and Stampin' Dimensionals.

Wednesday, November 17, 2010

Christmas tags with glass glitter and a Christmas cardinal decor element...

Tags are so much fun to make - and they make great use of your scraps! I used scraps of crochet trim and other ribbons with Deck the Halls dsp, along with Welcome Christmas and Gifted stamp sets. I've still got to take some photos of tags my friend and neighbor Beth gave me! You've never seen tags like hers - they are fabulous! Tune in tomorrow to see those.

I wanted to show you one of the adorable cardinals from the Candy Cane Christmas Decor Elements in the Holiday Mini. I bought this appetizer plate for a couple of bucks and rubbed on the cardinal using my bone folder. I'm going with a cardinal theme this year for Christmas. I need to pick up three more plates like this so I can display them on a wall rack I got awhile back.

Tuesday, November 16, 2010

A ribbon wreath for Christmas...

I'd been wanting to make a ribbon wreath ever since I saw the one near the back of the 2010-2011 Idea Book & Catalog. I picked up a wire wreath form Saturday at a craft store for $3.69. It is four rings of wire connected at six different points and is green. I think it's the 14" form. The wreath took one roll each of:

  •  1-1/4" Early Espresso grosgrain
  •  1-1/4" Real Red grosgrain
  •  1-1/4" Old Olive grosgrain
  •  5/8" Real Red satin ribbon
  •  5/8" Old Olive grosgrain
  •  and 2 rolls of Victoria crochet trim
It took my 10-year-old daughter and I 1-1/2 hours to make the entire thing! It was so easy, I never imagined.

Monday, November 15, 2010

Just a reminder: Starter Kit $87.50 today thru Nov. 30...

You may choose either the standard starter kit or the one that comes with My Digital Studio. Regardless, you'll get $310 worth of high-quality Stampin' Up! product for half price - $87.50 plus sales tax (FREE shipping!).


Stampin' Up! is trying to reach a recruiting goal of 10,000 new demonstrators for 2010! So now is the perfect time to start a new hobby, save money doing a hobby you already love, or start a business! The choice is up to you, and I can help you with whatever you'd like to do.


Some of the perks:

  • You'll get to pre-order items from the next Occasion Mini Catalog on December 1 (and the mini goes live on Jan. 4);
  • You'll receive the demonstrator magazine Stampin' Success every month;
  • You'll receive a free catalog every year you're active;
  • You'll receive MINIMUM 20% discount on every order (30% on your first order of $150+);
  • There's no obligation to do anything other than just enjoy your big box of goodies! You won't need to meet your quarterly quota till March 2011, if you decide to stay on as a demonstrator.

Please contact me at ericandterry@comcast.net for more details. Thanks, Terry

Our team make & takes...

Michelle brought this elegant make & take to our American Ink demo gathering Saturday. It uses Concord Crush and Pear Pizzazz, along with the single stamp Elizabeth and the jumbo wheel Very Vintage. Michelle removed the rubber from her jumbo wheels. On this one, she kept only the part of the rubber she liked and adhered it with SNAIL adhesive to the Clear Block I. She also recommended a mouse pad under the card stock you're stamping on to get a more even stamped image.

Sherry provided this Candy Cane Christmas dsp card. She embossed the white with the Northern Flurry embossing folder, and ran Real Red card stock through the Tasteful Trim die for the ric-rac piece. The Baja Breeze snowflake is also a die - Northern Frost Decorative Strip. We added lots of Dazzling Diamonds glitter and colored in the Cute Christmas snowman.

I put different ribbons and trims in a tote with a few stamp sets, buttons and Deck the Halls dsp for everyone to make tags. Here are two I made using the Welcome Christmas and Gifted stamp sets.

Sunday, November 14, 2010

American Ink team swaps...

Cheryl's Christmas owl punch card
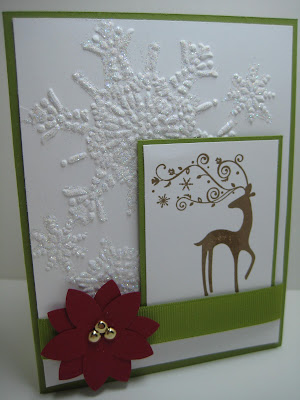
Barb's embossed Dasher card with punched poinsettia
Michelle's Autumn Spice/Day of Gratitude card
Karen's glittery window Christmas card
Sherry's Day of Gratitude punched card
Every month, members of my American Ink group get together to swap, stamp make & takes (cards and tags this time around), go over specials and promotions, and discuss business tips and ideas. Of course the food is always great!


If you'd like to join a wonderfully warm group of demonstrators, all you have to do is buy the Starter Kit, which is on sale for $87.50 (HALF PRICE!) Nov. 15-30. Just visit here and click on "Start Your Own Business." My recruiter password is: Terry Blais.


Have a great Sunday!