My Stampin' Up! Classes

Saturday, September 27, 2008

Autumn Vine designer tree...

The Autumn Vine designer series paper goes hand-in-hand with the Season of Friendship.

I used Sage Shadow, Really Rust and Chocolate Chip markers to color in the leaves, cutting out a few extra bunches to stick on with dimensionals for a 3d look (see the leaves sticking out off the sides and top of the Whisper White layer.

The white layer was stamped with the tree and leaves, then with More Mustard on the Twill background and sponged with Chocolate Chip.

The front of the card fits into the slit punch at the bottom left. I put a fire rhinestone brad in the slit for a little bling.

The sentiment comes from the stamp set and was sponged with Chocolate Chip with a knot of More Mustard grosgrain around it and stuck on with dimensionals.

Happy Autumn!

Season of Friendship...

As soon as I saw this stamp set in the Holiday Mini (available to customers Oct. 1), I knew I had to have it! I love the fall, the changing colors of the leaves... nature, in general.

This card is actually a birthday card for my hubby. I used markers (Pumpkin Pie, Old Olive and Ruby Red) to color in the leaves on the Close to Cocoa tree, which is stamped on Very Vanilla card stock.

The tree is layered on Chocolate Chip card stock, which is spiral punched on the left, with a strip of Pumpkin Pie card stock to add a bit more color. I sponged around the entire card with Chocolate Chip ink and stamped the greeting in the same ink.

Happy Birthday Eric!

Tuesday, September 23, 2008

10-card class designs for Christmas


I had a Christmas Card Stamp-a-Stack Sunday with five new card designs. There were 13 people there, so I doubled up on each project with the help of several friends. I always try to cut a couple extra cards for each project so I can stamp them and have a bunch ready for my own personal use each holiday!

The first card features a reindeer from Deer Friends, a Level 2 hostess set. It was stamped in Classic Close to Cocoa and punched out with a 1 3/8" circle punch, then layered on a Chocolate Chip scallop and stuck on with dimensionals. The red print paper is from the Summer Picnic designer series paper pack, with Chocolate Chip grosgrain knotted around the front of the card. I love the little red pom-pom for the nose! It's stuck on with a mini glue dot.

The second card features the Christmas Chatter jumbo wheel rolled on a Not Quite Navy ink pad over Bashful Blue designer series paper and layered on Not Quite Navy card stock. The little snowflake is from Short & Sweet and was punched out with a 1/2" circle punch, stuck onto the build-a-brad with a mini glue dot, then the clear bubble was laid over the top.


The third card is made from Old Olive card stock, and it uses the Spotlight on Christmas stamp set, as well as a saying from To You & Yours. The green striped designer paper is from the Summer Picnic pack and has a strip of More Mustard card stock over it and tied with a Bravo Burgundy piece of grosgrain ribbon. The flowers were stamped in Classic Bravo Burgundy and punched out with the 5-petal punch. A little glue in the middle of each helped chunky green glitter stick there.

The Kraft card stock snowman card features a new stamp from Holiday Lineup. It was stamped in Basic Gray twice - once on Brocade Blue card stock on the card (with Creamy Caramel gingham knotted around the left side), and the second time on Confetti White card stock, with just the middle snowman punched out with the 1 1/4" circle punch. We used Brocade Blue, Pumpkin Pie and Creamy Caramel markers to color in the snowman.


This card was made by one of my downline. She used Jolliest Time of the Year with Real Red, Basic Black and Whisper White card stocks. We used watercolor crayons and an aqua painter to color in the image, then covered the white areas on Santa with 2-way glue and Dazzling Diamonds glitter. The corners were punched off with the tag corner punch, a 1/8" punch made the hole for the knot of black grosgrain. The sentiment comes from Heard from the Heart, which is 15% off thru Sept. 30.


Monday, September 22, 2008

Spring has sprung again Starring You...

This is Louise's take on the card I did for my clubs last week. It uses Baja Breeze card stock for the main card, as well as Pacific Point and Kiwi Kiss card stock for the stars inside.

The shiny ribbon is the oh-so-soft Kiwi Kiss satin ribbon, which is vanilla on the other side.

The scallop on the front was punched with the same punch twice - first it looks like a regular scallop, then you can adhere it to a piece of copy paper and punch it with the scallop punch again, this time turning it so the scallops look more pointy.

So what do you think? Pick YOUR favorite color and go to town making your own spring card.


A twist of a Halloween favor...

This terrific little favor is called a twist container or a sour cream container. You use only 1/4 sheet of 8 1/2" x 11" card stock - here Louise (aka Kim) used the Ghostly Greetings designer paper - and crimped the ends.

The adorable bat is from Batty for You. It's stamped in Basic Black, punched out with a 1 1/4" circle punch, then layered with a 1 3/8" circle punch of Kiwi Kiss, then layered yet again on a black scallop circle with a knot of Tangerine Tango striped ribbon at the top.

These containers are perfect little favors. They hold a few Hershey kisses or other treats - candy corn, M&Ms, etc.

Trivia: Halloween candy sales average about two billion dollars per year. Chocolate bars top the list as the most popular treat with Snickers being number 1. (Source: http://www.bonita.k12.ca.us/allen/Fun/Halloween.htm)

Sunday, September 21, 2008

Flower Fancy...

Anybody would love to receive a beautiful and sparkly card like this one. Louise stamped the Tweed background stamp in Pink Pirouette ink on the same color card stock, then stamped "to you from me" (from the Level 1 hostess set Best Yet) in Basic Brown at the bottom.

Flower Fancy is a 2-step stamp set that makes card-making a cinch! You stamp the outline in one color (brown), and the inside in another. They may not line up perfectly, but it's a beautiful look and one that's easy to do!

Finally, the top two layers (shimmery white and Rose Red card stocks) were torn at the bottom with a knot of taffeta.

Saturday, September 20, 2008

Kim's House of Haunts card...

Louise (aka Kim) came up with this striking House of Haunts card.

The images are stamped in Basic Black. The round stamp was inked with Summer Sun and rock 'n' rolled in Tangerine Tango for the look you see here. Then the corners of the white and black card stock layers were taken off with the ticket corner punch.

The designer paper is from the Tangerine Tango prints package, adhered to a Tangerine Tango card and finished off with a black gingham knot.

Friday, September 19, 2008

Carousel Note purse...

I'm a big fan of Urban Garden designer paper and the Inspired by Nature stamp set. Together with carousel notes and envelopes and a lot of punches and a little ribbon, they make up this brag book purse I CASE'd from Jan Tink's blog. She has a tutorial there, so I won't go into much description here.

The front features double-stitched Baja Breeze ribbon, as well as a build-a-brad, scallop and 5/8" chocolate grosgrain for the handle.

Inside, there are two Chocolate Chip photo mats, as well as space for two more photos on the big scallops tucked inside each envelope and designated with a round tab with a brad through it.

From the side, the purse has a "W" shape. These photos were taken before I adhered the 1" round Velcro dot to keep it closed.

Among the punches used: photo corner, scallop, 1/8" circle, 1 1/4" and 1 3/8" circles, 5-petal flower and 1/2" circle (for the build-a-brads). Equally pretty on the front scallop would be a half pearl from the Pretties Kit.

I had a class on this last night and it was a big hit! This purse makes a terrific gift. It's a great way to share a handful of photos with family and friends.


Thursday, September 18, 2008

Jules' sneak peek...

I was happy to discover this adorable card in my mailbox today. My friend Jules made this card using a stamp set from the upcoming Holiday Mini (which starts Oct 1) called Eat, Drink & Be Scary.

The card uses Ghostly Greetings designer paper, black gingham ribbon and the word window punch.

It's too cute to be scary!

Starring You "spring" card...

From the outside, this Tangerine Tango card looks like any other. It's got Tangerine Tango designer paper at the top, coordinating striped ribbon in the middle, and a cute birthday stamp punched out with the scallop circle punch.

But look inside and stars spring up! I saw this idea at convention and loved it. I used two 1 3/4" circles, and cut each into a spiral with the sides no more than 1/8" thick. You don't want thick spirals because then you won't have that many "springs."

I punched stars out of Pacific Point, Tangerine Tango and Summer Sun card stocks in small and large sizes and adhered them to various places on the coils so when the card is opened they spring up.

I used Starring You stamp set, and punched the "way to go" with the wide oval punch.

Try one of these. They're fun!

Best Yet tri-fold card...

One of the projects this month at club is this Close to Cocoa and Bashful Blue tri-fold card.

I used a 4" x 12" piece of card stock (so you can get three of these cards out of a 12" x 12" piece of card stock) and scored it at 4 7/16" and 9". Then using a jar lid, I traced it with a hobby blade to get the curve on the front flat.

I love the look of the big circle brad. It goes right through a stamped image from Sweet Celebrations, layered on a scallop circle with holes pierced in each smaller scallop. It's stuck on with dimensionals.

The patterned blue paper comes from the Bashful Blue prints package. The other side shows in the middle inside of the card, where I used a stamp from the hostess Level 1 set Best Yet. I rounded the corners to carry on the curved theme from the front.
The striped Bashful Blue ribbon acts as a belly band to hold the card together.


Halloween Haunts treat...


This sweet little treat basket was made using the Big Shot and baskets & blooms die with Ghostly Greetings designer paper. With that one die, I got the basket, the small flower, band, and tag, plus so many more pieces.


The pumpkin, from House of Haunts, was the last project of the Halloween Spectacular. It was colored using Old Olive and Pumpkin Pie markers.

With the die and a Big Shot you could crank out decorations for a Halloween party in no-time!


Wednesday, September 17, 2008

With Gratitude...

Though the weather is more like summer around here, I love fall colors and felt like making a leaf card for one of this month's club projects.

The main card body is Really Rust card stock, with a strip of Always Artichoke at the top, stamped with a leaf in the same color ink and torn on one long side with a knot of Chocolate Chip grosgrain.

The big leaf was inked first in Really Rust. I took the Always Artichoke pad and rolled it around the edges and stamped it on Confetti Cream card stock. Then using an aqua painter and More Mustard ink, I watercolored in the open areas and blended some of the colors to make it look more realistic.
To finish the card, I used the ticket corner punch on both the confetti and More Mustard card stock layers, stamped a small leaf in Really Rust and the "With Gratitude" in Always Artichoke.

Tuesday, September 16, 2008

Bea's Halloween Spectacular contest winner!

Bea won the Card Contest at my Halloween Spectacular yesterday. Everyone in attendance votes for their top 3 favorites and those selected get to select from a variety of Stampin' Up! products. This was the winner. Congratulations Bea!!!

The card uses the House of Haunts and Haunting Halloween stamp sets. There's glitter, three cut-out pumpkins, a popped-out cauldron and ominous-looking clouds. The card itself is actually Naturals White card stock, with a layer of Pumpkin Pie. Spooky!
And again, Bea is one of my newest demonstrators and a wonderful asset to my team!

Cindy's House of Haunts...

Cindy's another of my new demonstrators. I think she did a terrific job on this House of Haunts card.

The house is embossed, the windows each have sparkle to them, and the grave markers are silver. The pumpkin with two ribbons is popped up with dimensionals... and the Old Olive pattern at the bottom of the card is a jumbo wheel.

I can easily see this as a party invitation! I'd go.... Mwah ha ha ha ha

Deanie's Fabulous Flowers card...

Deanie isn't new to stamping, though she is fairly new to Stampin' Up! - she just signed up with the $99 stamp kit a week ago! She made this lovely card using the Fabulous Flowers stamp set.

The card features textured Perfect Plum card stock, Rose Red and Whisper White.

It's hard to see on this scan, but she added glitter everywhere and cut several of the petals so they stand up to add a lot more dimension.

Pocket Silhouette love note...

This little 3" x 3" love note is so sweet looking in real life. The stamps are from Pocket Silhouettes, which is still on sale for 15% off thru Sept. 30 (and now you can order it on-line thru my website!).

The card itself is Pacific Point textured card stock, with a red gingham knot. The flowers and sentiment were stamped in Pacific Point ink and glitter was added to the flowers.

The flowers were punched out with the 1 3/4" circle punch, and since Stampin' Up! doesn't sell a larger one than that, I made the red layer by punching two round tabs from Real Red card stock!

The sentiment was punched out with the Word Window punch, and a Bold Brights brad was added.

Sunday, September 14, 2008

Sneak Peek: Halloween Frights...

You know, if you were a Stampin' Up! demonstrator, you could already own this fabulous Halloween set, called Halloween Frights.

In fact, every demo is able to purchase mini catalog sets a month before they're available to customers AND we get an additional 20% discount!

We can actually purchase one of everything in the Holiday Mini Catalog this month. The mini items are available to customers as of Oct. 1.

So what are you waiting for? You can sign up through my website today for only $99 and order everything NOW - http://TheRubberRoom.stampinup.net.

Oh, and Louise made this card, which uses Classic Old Olive and Basic Black inks, along with the lovely Ghostly Greetings designer paper, Old Olive card stock, and gold elastic cord (making a comeback in the mini).

Saturday, September 13, 2008

To You & Yours...

To You & Yours is one Christmas stamp set that caught my eye in the Stampin' Up! catalog. The snow-covered house with smoke coming out of the chimney evokes a very peaceful feeling in me.

This card is simple - it's Bashful Blue card stock, striped grosgrain ribbon, and designer series paper, with Pacific Point ink and layers.

The house image was punched with the wide oval punch, then layered on a 1 3/4" Pacific Point circle from that size punch.

I used a 2-way glue pen to add Dazzling Diamonds all over the snow for a sparkling look.

Friday, September 12, 2008

Heat embossed House of Haunts...

These Kiwi Kiss cards feature the Shaving Cream Technique, as well as a heat embossed haunted house.

Shaving Cream Technique:
Spray some shaving cream onto a paper plate and spread it evenly with a knife or spatula like frosting a cake.

Place a few drops of ink refills (here, Kiwi Kiss, Tangerine Tango and Lovely Lilac) on top of the shaving cream and stir with a straw or knife or bone folder till you get a pattern you like.

Place a 1/4 sheet of glossy white card stock glossy side down into the colorful shaving cream, making sure the entire surface touches the shaving cream. Pick it up and scrape off the shaving cream, wiping off the remainder with a paper towel. Let it dry a bit before heat embossing.

I used a VersaMark pad and black embossing powder for the house.

Random notes: I usually color at least 2 pieces of 1/4-sized glossy card stock at a time, though you can do more (I'd add a few more drops of whatever color might not be as visible as the others).

On these two cards, they're virtually the same except the Ghostly Greetings designer paper is flipped so you see each side (green words or black stripes). Also, there's more reinker on the top card.


Thursday, September 11, 2008

Louise's Upsy Daisy cards...

You know you've found a favorite stamp set when many of the cards you're creating use the same one! So Louise is in love... with Upsy Daisy. And who can blame her? You can use these cards for any occasion.

The colors are reversed on the cards and their layers, as well as on the ribbons - Regal Rose and Kiwi Kiss. And of course there's glitter on the butterflies!


Monday, September 8, 2008

Flight of the Butterfly...

If you love to scrapbook in the 12" x 12" size, you probably have tons of card stock on hand.

And once in awhile, I'm sure you need a card to send to a loved one. What to do? Use one quarter of a piece of 12" x 12" card stock to make a card like this!

I used textured Pink Pirhouette card stock with Whisper White and Riding Hood Red. The inks are the pink and red too. I used a 2-way glue pen and Dazzling Diamonds glitter to make the flowers on the butterfly really sparkle. Sponging pink around the white layer and adding pink flowers soften the card.

Stampin' Up! offers the perfect size of envelopes for this size of card. If you need some, contact me!

Upsy Daisy in an Urban Garden...

One of my downline made this card with Upsy Daisy and some Urban Garden designer series paper. And don't you love that flower brad?

What are you waiting for? Buy this stamp set already. It rocks!!! And it's still 15% off thru Sept. 30.


Oval owl House of Haunts card...

I love this owl in the tree stamp in the House of Haunts set. And guess what? It's my 2nd Halloween Card Kit.

Again, the price is $10 for 10 cards with envelopes (price doesn't include shipping; deadine to order is Oct. 15. You'll receive full sheets of Chocolate Chip and Whisper White card stock so you can fit all 10 ovals on them.

Add-ons include:
Basic Brown ink pad, $5.25
Coluzzle cutting system, $19.95
Crafter's Tool Kit, $39.95
Stampin' Dimensionals, $3.95
Cutter Kit, $16.95

Again, just e-mail me to place your order! Either Halloween card would work for a party invitation too.

Sunday, September 7, 2008

House of Haunts card kit...

I'm trying this Halloween Card Kit for the first time ever. I'm offering the supplies for 10 cards for only $10, with envelopes. (Price doesn't include shipping. Available till Oct. 15.)

To make the card featured, you need:

  • House of Haunts stamp set, $22.95
  • Basic Black ink pad, $5.25
  • 1 1/4" circle punch, $15.95
  • Ticket corner punch, $6.95
  • Adhesive, $6.95 SNAIL or refill for $4.50

If you're a customer of mine (or want to be!), you can order the kit and any of the above items from me by e-mailing me at: ericandterry@comcast.net.

If you're a demo who wants to make a workshop or class easier, the card kit is very affordable! I accept payment via Paypal or credit card. Just let me know the quantity needed.

Look for upcoming card kits!

Halloween cards and scrapbook pages

Haunting Halloween is a wonderful stamp set for making cards and scrapbook pages. And these are my favorite Halloween colors - Lovely Lilac, Basic Black, Old Olive and Pumpkin Pie.

I'm hosting another Halloween Spectacular this Sunday with the House of Haunts set, so look here next week for those projects - my downline came up with brag book pages that double as 3" x 6" cards. They're delightful!


Upsy Daisy stunner...

Louise is doing amazing things with this still-discounted Upsy Daisy stamp set.

This card uses Whisper White card stock, as well as Baja Breeze and Pacific Point card stocks and ink pads.

Louise used the cutter tool kit around all three top layers, as well as two types of Baja Breeze ribbon that she frayed a bit - the double-stitched and the striped grosgrain. Gorgeous!

And do you see the adorable clip holding the words? The butterfly is adhered with a Stampin' Dimensional and has Dazzling Diamonds glitter on it too.

Other tools used with this card are the small and large oval punches.

It's a stunner!

Saturday, September 6, 2008

Christmas stamp-a-stack...

Making Christmas cards gets me started singing Christmas carols! I love the holidays and enjoy making cards in the months leading up to them.

These are the cards we made at a Christmas Card Stamp-a-Stack last week. We used a variety of new products - Riding Hood Red taffeta ribbon, the 1 3/4" circle punch, Kiwi Kiss striped grosgrain, the scallop edge punch, Snow Swirled stamp set (still 15% off thru Sept. 30), Christ is Born stamp set, Holiday Treasures designer paper (on the Christ is Born card), and designer paper from the Level 3 hostess Holiday Happenings Bundle.

Now YOU can order any Stampin' Up! products ON-LINE through my demonstrator website - http://therubberroom.stampinup.net/ as of Tuesday, Sept. 9. Have your credit card ready!

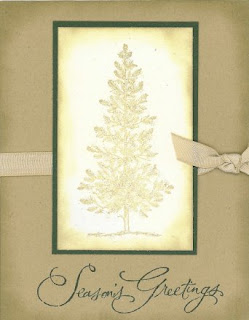
Other stamp sets used include Big On Christmas (the snowman face), and Lovely as a Tree (a card heavily inspired by Teneale Williams on Splitcoast), and Sleigh Bells Ring. I used Many Merry Messages for the "Season's Greetings" on the last tree card, as well as the phrases for inside the cards.

Oh, and don't forget the Dazzling Diamonds glitter! It makes every card sing!