My Stampin' Up! Classes

Tuesday, December 30, 2008

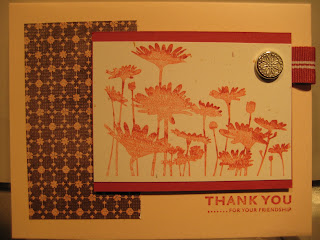
Flower Fancy "Thanks"...

If you've never done 2-step stamping, you should try it! The Flower Fancy stamp set is an ideal set to try.

For this So Saffron card, I used only Riding Hood Red and Kiwi Kiss ink pads. The outline of the images was full-strength ink - ink the stamp on the pad and stamp on your card stock (Confetti White here).

The insides of the flowers are filled with a second stamp. The darker insides are full-strength, while the lighter ones are stamped off once on grid paper. I stamped off on all of the leaves' insides.

The advantage to 2-step stamping is that it makes use of what ink pad colors you have. Obviously a lighter version of an ink color will coordinate perfectly with the full-strength color.

The "thanks" is from the Thank You Kindly stamp set and punched out with the wide oval punch. It's adhered over 5/8" Old Olive grosgrain with dimensionals.

Monday, December 29, 2008

Stitched Exotics thank you...

There are so many colorful ways to say "Thank You." These colors come straight off of the Washington Apple designer paper — Pumpkin Pie, So Saffron and Riding Hood Red.

Just one flower was used from Stitched Exotics. It was cut out, a fire rhinestone brad inserted into the middle, and stuck on with dimensionals.

The sentiment comes from the Thank You Kindly stamp set. You can get 20% off this set by ordering $20 of anything else first!
Also, you may order anytime, day or night, from hitting the SHOP NOW button on my website - http://therubberroom.stampinup.net/.

Sunday, December 28, 2008

Absolutely Fabulous & jumbo wheel...

Sticking with a thank-you theme, this Very Vanilla card uses the jumbo wheel Leaves ala Carte, along with stamps from the Absolutely Fabulous and Boho Blossoms sets.

Everything is Chocolate Chip - the ink, the scalloped circle behind the Boho medallion, and the 5/8" grosgrain ribbon.

This is a quick way to say "Thanks for all you do."

Saturday, December 27, 2008

Pun Fun thank ewe...

After Christmas is a perfect time to stamp and send out thank-you cards.

This adorable "Thank ewe" from Pun Fun is stamped in Basic Brown and colored a bit with Creamy Caramel and Regal Rose markers. The sheep is layered on Regal Rose and stuck onto the front of the card with dimensionals.

The Pink Pirouette card has a 2" x 5 1/2" strip of Sweet Always designer paper, and some gorgeous double-stitched Chocolate Chip grosgrain.

Thank you for looking at our blog and supporting us! We appreciate it.

Friday, December 26, 2008

A card & stamp set for all seasons...

This Perennial Favorites stamp set and a variety of textured cards and designer paper and embellishments really makes each season unique.

The words came from the Inspired by Nature stamp set. A scallop edge punch was used, along with the square scallop punch.

Pearl and Cindy made these cards for me. The lesson to be learned? You don't need to reinvent the wheel every time you sit down to stamp. Find a design you like and stamp it using different colors, papers, etc. Have fun with it!

A card layout like this is a great one for a stamp-a-stack, where customers stamp 10 cards in an afternoon.

Thanks for the great card ideas, ladies!


Pearl & Cindy cards...

Here are some great ideas, shared by my friends Pearl and Cindy, for anything from birthday cards to thank-you cards. Who couldn't use more of those?


Elegant Blossoms Abound card...

I feel very blessed to have friends like Cindy and Pearl. They are so kind and generous. I want to share with you many of the cards they gave me just recently. It was a treat to receive cards!

I hope you enjoy them as much as I do! There are a variety of stamps used (including this retired one, Blossoms Abound), as well as embellishments.

Monday, December 15, 2008

Inspired by Nature decorative tile...

With little craft stampin' spots (Old Olive and Bravo Burgundy here) and some glassy glaze embossing enamel, you can stamp on any tumbled marble tile, and add some ribbon for a nice gift.

This stamp set, Inspired by Nature, has been one of my favorites. I love reminders such as "live with passion."

I baked the tile in a 300 degree oven for 10 minutes. Make sure the tile cools before adding the ribbon! Add an easel for a great display idea.


Sunday, December 14, 2008

Ski Slope Cute & Curly...

The chance to get 30% off the Curly Label punch bundle came and went so fast around Thanksgiving that not many of you had an opportunity to order it! So I'm continuing the discount thru the end of December. You get the Cute & Curly stamp set plus the punch. That means instead of $33.95, you'll pay $23.78 plus tax and shipping (or get free shipping if your order is $70+ and placed by Dec. 23). You've gotta love it!

This Whisper White card uses a 4" x 4" square of Ski Slope paper. I used a 2-way glue pen to mark the snowflakes so Dazzling Diamonds glitter would stick to them. They sparkle nicely!

The striped Baja Breeze ribbon is knotted at the bottom of the designer paper. And the "Merry Christmas" was stamped in Baja Breeze and punched out with the Curly Label punch, then adhered to the card with dimensionals for a little "pop."
Quite divine.

Scandinavian Season...

I'm trying to catch up with a couple of cards from my stamp-a-stack last weekend. This one uses the Holiday Mini Catalog stamp set Scandinavian Season, as well as some Frosty Day paper.

The greeting is from Sincere Salutations. I had a different sentiment stamped there, but didn't like the font against the tree lines, so this was a quick fix. Everybody at the stamp-a-stack simply stamped directly on the card front.

This is a Kraft card with the Old Olive tree stamped on Whisper White. The flower was stamped on a scrap and cut out, and the half pearl (from the Pretties Kit) was stuck on with one mini glue dot.

We used the cutter kit to rough up the edges of the white and Old Olive layers. Simple, eh?


Saturday, December 13, 2008

Home decor for the holidays...

My friends and downline Cindy and Pearl made this gorgeous glass block with a "Jingle all the Way" decor element on it. I think Pearl did a fabulous job on the bow!

This decoration adorns my kitchen island and I love it! When the light hits it it looks magnificent.

Give a decor element a try! Remember - there's FREE shipping on any order of $70 or more from now thru Dec. 23.

Merry Christmas!

Mr. Twigster giftcard holder...

With half a sheet of card stock and your favorite stamp, you can make a giftcard holder like this one that uses the Mr. Twigster stamp set.

This Bashful Blue one is 4 1/4" x 11". It's scored at 3, 5 1/2, and 8 inches. Then you "pinch" together the two middle panels and put adhesive on the sides and where the two pieces come together, taking care to keep the the middle "open" so there's room for the giftcard.

With the fold up, punch halfway in with the Word Window punch twice, side by side. I used a 1" circle punch to make a finger pull when you insert the gift card in the middle.

I used scraps of Frosty Day designer paper to decorate the front and back of the holder. The striped Kiwi Kiss ribbon is held on with the layers behind Mr. Twigster.

Friday, December 12, 2008

Holiday Collection giftcard holder...

My friend and downline Jules sent me an adorable giftcard recently that I wanted to duplicate for my Santa's Workshop Saturday.

This uses Frosty Day designer paper, the big snowflake from Holiday Collection (part of the Country Living , and a rub-on from Season of Cheer.

I punched out the big snowflake with the 1 3/4" circle punch, then used a 1/8" punch for the inside and inserted a small silver circle brad. Also, the rub-on has two silver brads on either side of it.

Top Note mini album...

I love how quick and easy this mini album came together. I used the chipboard that comes with the designer paper for each of the 5 pages cut using the Big Shot and Top Note die. I'm only showing a few pages here.

The paper is retired, but I felt appropriate for this mini album, since it includes family photos. There's a whole lotta love there! The paper is adhered using a glue stick.

I used the Crop-a-dile to punch 3/16" holes in the corner of each Top Note, set a jumbo eyelet in the first and last Top Note, then put a ring through and added ribbon knots.

The heart is from the Level 3 hostess set Holiday Happenings Bundle. I stamped it in Craft Chocolate Chip ink and embossed it with clear embossing powder on Whisper White card stock. There's a square scallop punched out of Regal Rose card stock and layered on a Chocolate Chip square.

The "Joy" is part of the Join in the Cheer die for the Big Shot. It was easy to cut just this word out.

This is a project for tomorrow's Santa's Workshop!


Eyelet candle...

I thought a good use of eyelets would be pushing them into a candle. It's cute and really easy!

My 8-year-old daughter helped with this candle. She used only Glorious Green and Real Red eyelets, so I cut a 10" strip of Glorious Green 1 1/4" wide and adhered it around the candle (it's stuck to itself). Then I added a knot of 1/4" Real Red grosgrain.

For the decorative medallion, I used the Level 2 hostess set Deer Friends. I inked it with markers, punched it out with the 1 1/4" circle, layered it on a 1 3/8" Glorious Green circle, then layered it on a Real Red scallop that's stuck onto the band with dimensionals.

This is one of the candle projects at my Santa's Workshop. We'll be stamping on the others!

Snow Flurries build-a-brad tins...

I love build-a-brads and have saved up about 10 tins. So now it's time to use 'em up!

My friend and downline Bea gave me some lovely green Party Lite tealights - two fit in each tin with Old Olive card stock inside, separating them.

Like the tin below, there's a belly band of Ski Slope designer paper with snow flurries and a rhinestone brad, a sentiment (from the Level 1 hostess set Best Yet), two punches (wide oval and 1 3/4" circle), and sponging with a sponge dauber and Old Olive ink.

Snow Flurries tealight tin...

This nugget tin holds six tealights (Gold Canyon's Christmas Time - they smell awesome!). There's a piece of Old Olive card stock in the inside bottom of the tin that has the corners rounded. The middle is "pinched" so there's a card stock divide between two rows of three tealights.

The belly band is a strip of Ski Slope designer paper. The giant white snowflake is a from the Snow Flurries pack (in the Holiday Mini) with a rhinestone brad in it.

The Merry Christmas is from All Holidays. It's stamped in Real Red and punched out with the wide oval punch, sponged around with Old Olive and layered with dimensionals on a 1 3/4" Old Olive circle.

This idea came from here. It's just one of the many projects we'll be making tomorrow at my Santa's Workshop!

Tuesday, December 9, 2008

Two Cool Dudes card...

This is a fun and fast card to make if you need more Christmas cards this month. The card itself is Bashful Blue, with a strip of Pacific Point on the left.

The Two Cool Dudes stamp set consists of three stamps - the big snowman and phrase you see here - as well as a smaller snowman that fits perfectly in our small tag punch (so you can layer it with the large tag punch!).

The snowman is propped up with dimensionals behind the Whisper White layer.

What's great about the card is it only uses one ink pad - Pacific Point.

So what are you waiting for? I hope you get started on sending out your Christmas cards, if you haven't already!

Monday, December 1, 2008

Noel pennant banner...


This is my first banner and I'm pretty happy with it. It uses several Sizzix dies, including the Pennant Bigz XL Die, Serif Essentials, Scallop Circle #2, and Snowflakes Set #1.


The banner uses Real Red textured card stock with Ski Slope designer paper.

I used clips, miscellaneous ribbons, silver brads, a Uni-ball white gel pen, circle punch, rhinestone brads and dimensionals.