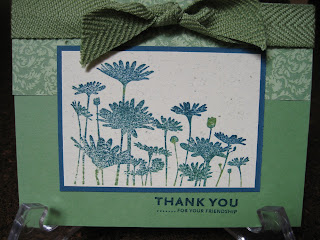
 Louise brought this make & take to our last demo meeting. I love Baja Breeze! Check out that ribbon and designer paper. They're gorgeous.
 My Stampin' Up! Classes
Wednesday, August 27, 2008
Baja Breeze beauty...
 Louise brought this make & take to our last demo meeting. I love Baja Breeze! Check out that ribbon and designer paper. They're gorgeous.
 Tuesday, August 26, 2008
Upsy Daisy...
 Louise made this beautiful card for me and I love it!
It uses Upsy Daisy, which is 15% off thru Sept. 30, as well as the butterfly from Dreams du Jour and the Pretty Petals background stamp (on the dormant list), along with Pacific Point and Baja Breeze (new In Colors).
Both the Whisper White and Pacific Point top card stock layers are distressed using the cutter tool kit.
The silver hodgepodge and dazzling diamonds glitter on the butterfly add bling.
Thanks goob!
Monday, August 25, 2008
Thanks for Everything...
 A little Flower Power paper, a giraffe (from Wild About You) and "thanks" (from Thanks for Everything) come together to make what I think is a nice-looking fall card.
The card itself is More Mustard, with Old Olive layered behind the giraffe. The brads are Rose Red (Rich Regals), Old Olive and More Mustard (Earth Elements). And a knot of Perfect Plum finishes the card.
Trivia: A giraffe ranges widely and sometimes is found hundreds of kilometers from water. A giraffe can go for more than a month without drinking, and the few times it does drink, the animal must spread the long forelegs widely to reach the water. (Source: http://squidoo.com/africansafaritriviaquestionsandanswers)
Sunday, August 24, 2008
Big Shot goody...
 It's easy to see how addicting this machine can be! With the coming of the Holiday Mini Oct. 1 (Sept. 1, if you're a SU! demo), you'll be treated to TONS of fabulous dies.
This is the Top Note die using Kiwi Kiss and Whisper White card stock. There's a perforation mark around the perimeter, which we cut off of the white to layer on the green.
Then we used Upsy Daisy (15% off thru Sept. 30) flowers in Kiwi Kiss and the "Thank You" sentiment in Chocolate Chip. The topper is stapled to a small cello bag filled with peanut M&Ms.
You can fold the Top Note the other way for larger cello bags. It's a quick and easy way to make favors for neighbors, classes or any occasion.
Demo meeting swaps...
Thursday, August 21, 2008
Here's the Big Deal - Big Shot!


Cut through the following 50 materials using steel rule dies and your Big Shot machine. Please note the maximum thickness of several materials.
Brass (.055)
Light weight steel
Aluminum (.016)
Tin (.008)
Aircraft plywood (1/64")
Basswood (1/16")
Balsa (3/32")
Paperwood
Mat board (adhesive or none)
Chipboard
Fabric
Silicone
Foam with chipboard (.1)
Corrugated pad
Adhesive-backed cork
Fine sandpaper (.00)
Strene
Extra thick template plastic
Template plastic
Plastic canvas (7 mesh)
Bubble wrap
Sheet foam
Friendly (jewelry) plastic
100% pure beeswax (cut with parchment paper on top & bottom of beeswax)
Adhesive and non-adhesive rubber
Ruffleboard
Static cling vinyl
Warm & natural batting
Fusible fleece
Quilt batting
Adhesive and non-adhesive flexible magnet
Heat n' shrink plastic
Adhesive and non-adhesive felt
Pop-up sponge
Shiny self-adhesive and non-adhesive paper
Iron-on fabric
Poly foam adhesive and non adhesive
3-D illusionary plastic
Glow in the dark adhesive and non adhesive
Suede paper
Funky fur
Personal Embossing Plastic (PEP)
Shaggy plush felt
Canvas
Vinyl flooring
Shelf lining
Placement
Embossing rubber
Thin leather
Gasket material
Sunday, August 17, 2008
Saturday, August 16, 2008
Owl Together Now diorama card...
 Diorama cards are great fun to make with punches and your favorite stamp set.
This one uses Creamy Caramel card stock (2 pieces that are 3" x 8 1/2" and scored 2 inches from each end), and Sage Shadow card stock (1 piece that's 3" x 6 /2" and scored 1" from each end). I shoved the 1 3/8" circle punch as far as it would go from the bottom and lined up the outside of the punch with the folded lines, punching holes. Then I lined up the circle punch in the middle (eyeballing it) and punched a third time. Do that on one of the Creamy Caramel layers, and the Sage Shadow layer.
I used classic Chocolate Chip ink for the leaves and hearts. The owls were stamped in Basic Brown and colored with a Brocade Blue marker and a blender pen and Tangerine Tango ink pad. They're cut out and stuck on with dimensionals.
On the Sage Shadow layer, I stamped the flower numerous times in Sage Shadow at the bottom and dotted the centers of each flower with the Uni-bal white gel pen. I then stamped the flying owl a few times at the top of that layer.
The back layer is the easiest. I stamped the entire branch and stuck on a cut out owl, then stamped hearts around its head.
This card collapses flat and fits into a 3" x 6" small open-end envelope. Give it a try!
Faux silk technique...
 Faux silk is a fun and easy technique.
We're making this card in my clubs this month. The branch with flowers is from a new stamp set called Eastern Blooms. It has a variety of flowers in it and is 15% off thru Sept. 30.
The flowers are stamped in Riding Hood Red on tissue paper, then you wad it up into a little ball, unfold it, and adhere it to a piece of Whisper White card stock with glue stick. The tissue paper needs to be larger than the white layer. When they're glued together, turn the white card stock over and trim the tissue around the edges.
From there, we layered it on Pink Pirouette card stock and Riding Hood Red that's been punched at the bottom with the new scallop edge punch.
SU! sells Riding Hood Red taffeta ribbon, but my order hasn't arrived yet, so I improvised by using white taffeta ribbon and passing it between my Riding Hood Red ink pad and sponge three times. Tip: Cut your ribbon a couple inches longer than you need it so you don't dye your fingers.
I used a 2-way glue pen and Dazzling Diamonds glitter in the center of each flower for that added sparkle. The card is finished with the greeting, which comes from another 15% off stamp set called Heard from the Heart.
I hope you'll try this technique!
Inspired by Nature...
 This is one of my favorite sets in the new catalog. It's called Inspired by Nature. It comes with 4 images (4 labels) and 2 wooden blocks, so it's double-mounted.
New Decor Elements!
Quick little booklets...
 While in Utah for the Stampin' Up! convention, I visited a friend of mine, Jules. She has loads of SU! stuff so we played for the few days I was able to spend with her.
Here are two of the little books we made using all SU! product (including rub-ons and the new stamp set A Flower for all Seasons).
The "Live Every Moment" book features photos of my friend's family and is adorable in real life.
Jules made the little pink book for me on her own. We were playing with the Zutter Bind-It-All and having a ball! The covers of the booklets are chipboard that we covered with designer paper. Super easy!!!
And I was really surprised when Jules bought me a Bind-It-All! This machine (and my friend) ROCK!!!


